Photoshop 911 forum member laments that none of the online tutorials for grids allow the grid to work out evenly in the required picture space. Well, that’s because most of those tutorials never consider real-world application. Here… let me show you how…
J.R., a Photoshop 911 reader from Oklahoma writes :
I’ve been reading tutorials online for a grid, but none of them really work out the way I want
can you help me do a grid that works out evenly to the image montage I’ve got?
Building a grid in Photoshop
 Generally speaking, most of those tutorials are quick and basic, just to generate ad revenue, and never really take into account the intended purpose of the piece. When planning a photo montage to fit into a grid — if you want the grid to come out accurately — you’ve got to do a little math and planning before Photoshop.
1) What is the final size and intended use?
2) Are the images all to the same, proper resolution?
Once you’ve established those two questions about the project, you can proceed at good speed.
For this demonstration, I’ll use a 600 pixel “final” size. (Since my web column is 600 pixels!) Knowing that, I assertain how many blocks I want in the grid. So, let’s say 8.
600 divided by 8 = 75.
With that math, we know that our grid size will be 75 pixels. So, lets set up the file.
![]() Mosaic Montage File: Start the new file: 600 pixels by 400 pixels
Mosaic Montage File: Start the new file: 600 pixels by 400 pixels
Set the resolution to what ever is required for the final project, also keeping in mind the resolution of your existing images.
![]()
![]()
![]()
![]()
![]()
![]()
![]()
![]()
![]()
![]()
![]()
![]()
![]()
![]()
![]()
![]()


![]()
![]()
![]()
![]()
![]()
![]()
![]()
![]()
![]()
![]()
![]()
![]()
![]()
![]()
![]()
![]()

![]()
![]()
![]()
![]()
![]()
![]()
![]()
![]()
![]()
![]()
![]()
![]()
![]()
![]()
![]()
![]()
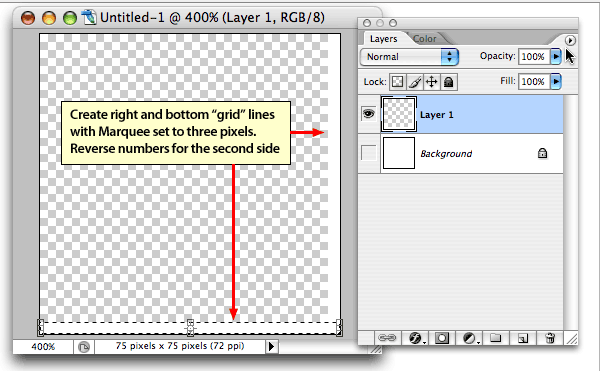
Then reverse the numbers to 3 and 78 to draw the right side grid separator. I added some slop with the 78 just to make sure I got the full 75 pixels.
From this file, we’ll make our Pattern for the Mosaic file.

![]()
![]()
![]()
![]()
![]()
![]()
![]()
![]()
![]()
![]()
![]()
![]()
![]()
![]()
![]()
![]()
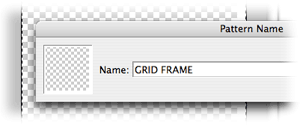
Edit > Define Pattern and then
Name the pattern and click Okay
This will save the two border lines as a pattern, which will become our grid in the Mosaic file. Note that we saved the right and bottom, white lines on a transparent layer. This will remain transparent in the pattern once generated.

![]()
![]()
![]()
![]()
![]()
![]()
![]()
![]()
![]()
![]()
![]()
![]()
![]()
![]()
![]()
![]()
![]()
![]()
![]()
![]()
![]()
![]()
![]()
![]()
![]()
![]()
![]()
![]()
![]()
![]()
![]()
![]()
![]()
![]()
![]()
![]()
![]()
![]()
![]()
![]()
![]()
![]()
![]()
![]()
![]()
![]()
![]()
![]()
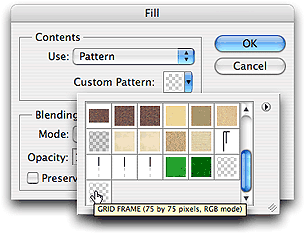
Select Edit > Fill to initiate the Fill dialog
![]()
![]()
![]()
![]()
![]()
![]()
![]()
![]()
![]()
![]()
![]()
![]()
![]()
![]()
![]()
![]()
Contents > Use: > Pattern
![]()
![]()
![]()
![]()
![]()
![]()
![]()
![]()
![]()
![]()
![]()
![]()
![]()
![]()
![]()
![]()
Then scroll down until you find the pattern you just created. Select that pattern and finally, click Okay.
Your 600 pixel file now has a white pattern on a transparent layer that works out perfectly to the width of the file.
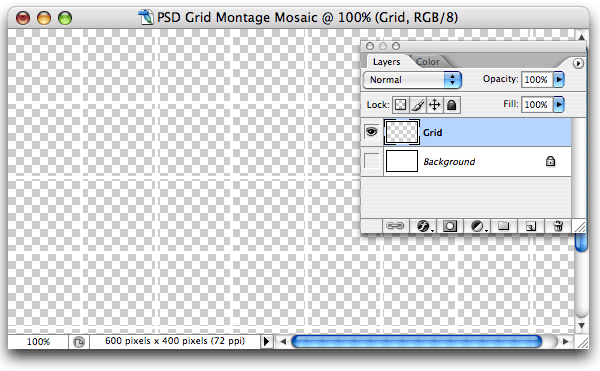

The depth is secondary, we’ll work within even tile openings, then trim the depth later. If you are required to have a set depth to the file, then you’ll have to do the math thing for both dimensions until you arrive at even tile sizes in both directions. Let me warn you at this point — if the aspect ratio of the file doesn’t allow for even sized grid tiles, you’ll be forced to have rectangular grid tiles. This may or may not be what you want.
Next: Build our montage mosaic in the grid file
Transform your Photos into a Mosaic grid
Now, this tutorial will show you how to take photos and craft them into a beautiful mosaic grid. It does not matter in this Photoshop tutorial what files you have — since I really like my S2000, I’ll just use photos of it for this tutorial.
Now that you have your grid file, you can begin using Photoshop layers below the grid layer to decorate the project. Always keep the grid on top, so you can see where images will be positioned. Don’t build your montage until you have the grid in place. Sometimes I like to make a duplicate of the grid and color it black for testing very light subjects. (As you will see further into this tutorial.)

![]()
![]()
![]()
![]()
![]()
![]()
![]()
![]()
![]()
![]()
![]()
![]()
![]()
![]()
![]()
![]()
![]()
![]()
![]()
![]()
![]()
![]()
![]()
![]()
![]()
![]()
![]()
![]()
![]()
![]()
![]()
![]()
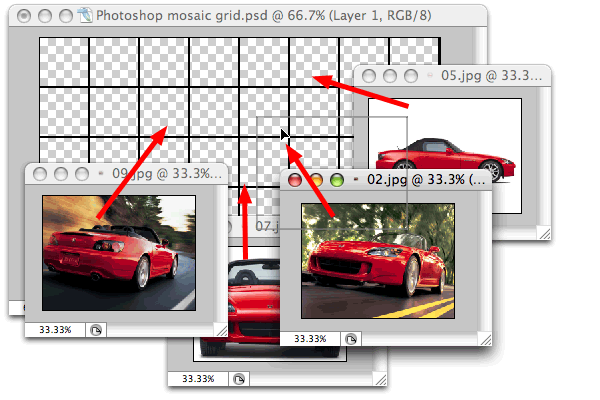
Using the Move (V) tool, just drag the image out of its file frame and drop it into the grid file frame. You may want to make adjustments along the way, but I just drag them all and drop them all. Remember, you can always turn off a layer by clicking its eye icon if an image gets in the way.

![]()
![]()
![]()
![]()
![]()
![]()
![]()
![]()
![]()
![]()
![]()
![]()
![]()
![]()
![]()
![]()
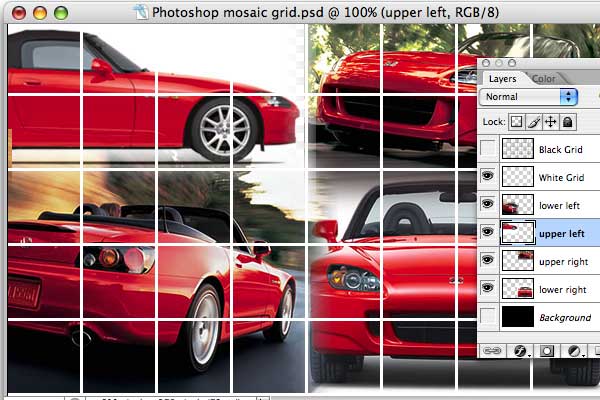
Adjust the Images: now you can set to the chores of scaling and positioning the images, and feathering or blending their edges. If you need help feathering, see our article on building montages. Drag them around using the Move (M) tool, and get them into perfect position. Shuffle the layers, sending some forward or backwards until you get the transitions between them just right.

![]()
![]()
![]()
![]()
![]()
![]()
![]()
![]()
![]()
![]()
![]()
![]()
![]()
![]()
![]()
![]()
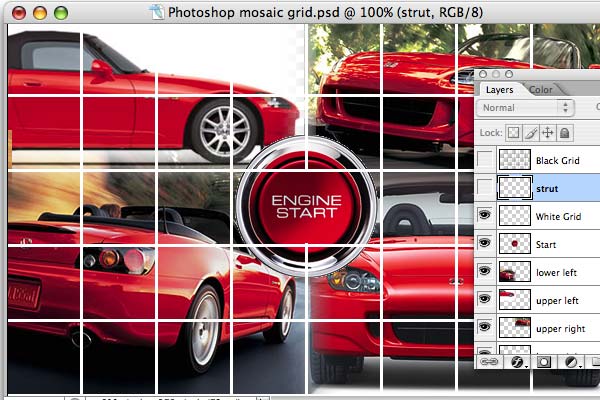
I made a selection of just that strut then used Cmd/Ctrl/Shift J in order to “float” the grid strut up to its own layer. I did not want to delete it — I might want it back later. If you use Cmd/Ctrl J without the shift, it just makes a copy. The shift key actually cuts the selection.

![]()
![]()
![]()
![]()
![]()
![]()
![]()
![]()
![]()
![]()
![]()
![]()
![]()
![]()
![]()
![]()
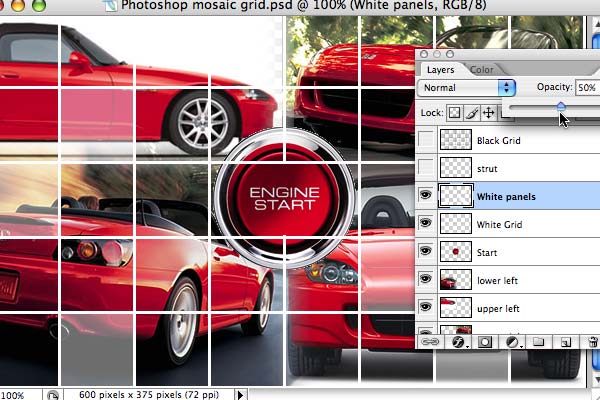
Varying Grid Panels: Some might wish to vary some of the grid panels. If lightening, just switch to the Grid layer, and use the Magic Wand to select, then shift/select the grid openings you wish to affect. Once selected, fill those selections with White (or any other color you so desire) and then adjust the Opacity slider to suit.
Go for it! Add type, or other elements to finish your masterpiece. Keep the file in this native Photoshop format — you never know when you might need another 600 pixel white or black grid! Then use File > Save As… to save it out to what ever format you need.
I added a little type just for my own ego — here’s our finished grid mosaic.
As you go through Photoshop tutorials like this one, keep thinking of all the variations and modifications you can make to these steps. The results can be limited only by your imagination. For extra help, see our Feathering tutorial, or feathering with masks tutorial
— and if you need montage help, this montage tutorial, or even better yet, try this Photoshop Tutorial that uses slices
Thanks for reading
Don’t forget … we encourage you to share your discoveries and favorites with other readers. Just comment below, discuss it in the Design Cafe, send an email, or give me a tweet at Twitter/DTG_Magazine