

Bringing images together for montage
One of the more frequent questions we receive is how to bring photos together for montage or collage. Actually layer masking is by far the best method to learn, however my layer masking seminar isn't quite complete yet.
I was complaining about how much time it takes to put an article together-- finding the appropriate photos to use, running the process, documentation and gathering screen captures -- when Mr. Pixelsmith said: "Here, take these and just use layer blending modes."
He passed over a folder of photos trapped in his spam filters, and shucks, we figured if the spammers sent the photos to the address intended for submissions, that means we can use them. So I picked out these to illustrate the following easy way to...
Merge Photos: Quick & Easy Way
Getting started with merging photos using this method will get you up and running in no time and will open your vision to lots and lots of possibilities using this way-too-simple technique. In a nutshell, add all the pictures, move them into position, set their blending modes, erase away any parts you don't want, and presto, you're done.
First, gather your photos for the montage. Before you start you should have a target size and resolution in mind. All photos should be sized and sampled to the same resolution of the intended output. This wards off any problems once you begin assemblage.
Step 1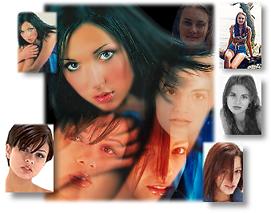
Create the base Photoshop file to the size and resolution needed for output.
Step 2
Show the Layers Palette and open each file to be added
Use the Move Tool (Tap V) and one-by-one drag each image to be added into the base file. Observe that as they arrive in the base file a new layer will be produced.
Once you have all your files imported, it's a good idea to save the file as a PSD file.
Step 3
Now comes the easy part.
Turn off all the layer images except the first one to be merged. Do this by clicking on the "Eye" icons in the left column of the layers palette. This let's you concentrate on just the one image.
Set the transparency of the layer to around 50% so you can see both the base image and the current layer at the same time.
Move the layer around until the portion you wish to use is in position in relation with the base image.
In our example, we started with one of the larger images because it had lots of dark areas, and other lighter areas where we could add other images for today's presentation. At this point you'll probably want to open the full diagram to follow along. It will open in a separate browser window you can keep open to the side while you are reading.
Our first "face" is in the upper right-hand corner. We simply pulled it in and set its layer Blending Mode to "Multiply" -- ghosting the face into the background. Slide your Opacity slider until you achieve the desired strength.
Layer Blending Modes are found in a drop-down button near the top of the Layer Palette just above the tools. (Ignore the second layer for now, we'll get to that in a moment.)
Using the Eraser Tool (Tap E) set to a large, soft brush, we then erased all the image except the area around the face we wanted to show. You could also use the Lasso (Tap L) set with an appropriate Feather. (Set the Feather either in the Options Bar across the top of the screen, or choose the menu: Select > Feather.
That's basically all there is to it besides experimenting with the various other Layer Blending Modes.
Step 4
Show the next layer to be modified by following step 3 above. Do this on each successive layer. No need to hide the 'finished' layer -- just let it stay so you can see the build as it happens.
The next layer positions the face in the base model's arm. It's a nice light spot and seems to be made for the photo. We did have to reduce this one a bit - using the Transform tool (Cmd/Ctrl T), and dragging with the Shift Key.
This Blending Mode is "Overlay" which brings out the facial features yet blends them with the arm.
Next comes the upper arm image, and since this one was a grayscale photo we used the "Soft Light" Layer Blending Mode to retain some lightness to the image.
Finally the face in the lower left, was set to "Hard Light" Layer Blending Mode and an Opacity of 57%. This blends it well into the base model's skin tones.
Note that in all cases, once the image was in place the unused portions of each layer were removed using the soft-edged eraser.
Once you've gotten this far it's a matter of merely going back and tweaking the settings, or trying other layer blending modes.
Side Notes
After the faces were in position, I noticed that much of the detail in the underlying base image was distracting from the assemblage. To remedy this I would need to blur all but the face.
I made a loose selection around the primary lady's face, set the Lasso selection to Select > Feather around 16 pixels, returned to the Select Menu, this time hitting "Inverse" (To select all the background) and gave it a Filters > Blur > Gaussian Blur of about 3.
Since I was calling so much attention to the main face, I began noticing complexion discrepancies and flaws. This too is easy to remedy.
Smoothing the Complexion
Drag a copy of the image in question. In this case the image was the background so we dragged the Background to the New Layer button (Next to the Trash Can on the Layers Palette).
In this new layer we again selected Filters > Blur > Gaussian Blur and blurred the face just slightly until the skin was all smooth. (This sort of gives it an air brushed look.)
Now I returned to the Eraser tool and selected a very small, soft-edged brush and erased the layer away to reveal the eyes, mouth, hair, and other features I wanted to remain sharp. Look at the thumbnail of Layer #2 and you'll see where I've removed parts of the layer.
Presto, smooth skin. Here's a low resolution copy of the final.
The Quick & Easy Solution
We feel this was a good solution. It took about 15-minutes to produce this file. Probably less time than it takes to read this tutorial. I'm working up a complete, fully illustrated introduction to Layer Masks that will empower you with many more capabilities for superb assemblage. You'll want to add that to your learning experience as well.
And that wraps up another case study from the emergency calls at Photoshop 911 dot com. To see more case studies, and tips generated from Photoshop911 just go to our Tips & Tricks department.
Return to the Photoshop Department, or the Design Center Main Index
Participate in your Design Center
Lots of fun and information for all... don't forget, any community is only as good as the participation of its members. We invite your tips, tricks, comments, suggestions and camaraderie.- Ask for the DT&G Monthly: to receive DT&G newsletter each month, happenings in the Design Center and regular columns like the "Mail Bag" and "Cool Sites"
- SUBSCRIBE : to the Designers' CAFE email list
- Link to this site, and then show us the link. We'll send you any of our current door prizes, just for your trouble.
- SUBMIT: a news link, new font, or product review
- SUBMIT: a link to a Photoshop web site