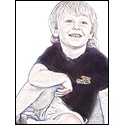
Just about every week we get at least one post to the Photoshop 911 Emergency page asking how to convert a photo to a drawing. Last week, Nicole from NJ, USA using Mac OS X and Photoshop 7 asked: "How do you turn a photo into a drawing in photoshop?"... but Nicole is not alone.
So we turned to Mr. Mark Clarkson, who has been involved in digital graphics since 1987, and has used Photoshop just about every day since its introduction in 1990. He's a cartoonist, a 3D animator, and author of many books and countless magazine articles on the topic of all aspects of technology. Mark's most recent book is Photoshop Secrets of the Pros, and we're delighted that he could take time to send this tutorial to the rescue of all our Photoshop 911 callers...
Photoshop Pixels to Pencil Drawings
by Mark Clarkson
Photoshop offers a number of special effects filters designed to create pen, pencil, and paintbrush effects, but none of them creates a really satisfactory pencil sketch in my opinion.
The best pencil sketch effects are achieved through Photoshop's very coolest feature -- Layer Blend Modes. It's easier that you think. Here's one way to do it:
1) Start with the photo to be Sketched
Open your photograph in Photoshop and crop or resize it as necessary.
2) Remove The Color
(If you're starting with a black and white photo, you can skip this step.)
Create a new adjustment layer, by selecting menu:
Layer > New Adjustment Layer > Hue/Saturate.
When the Hue/Saturation dialog appears, slide the Saturation slider all the way to the left, removing all color from the photo.
Figure: hue/saturation layer added
3) Duplicate The Photo On A New Layer
In the Layers palette, click and drag the original photo onto the Create a New Layer button at the bottom of the palette. This creates a duplicate of your original artwork.
4) Invert The Colors Of The New Layer With the new layer selected, press Ctrl+I to invert the colors in the photo. Figure: inverted (Your photo will look like a negative, which it is.)
5) Set The Mode To Color Dodge.
Change the blend mode of the new, inverted layer, by choosing Color Dodge from the blend modes drop-down list at the top of the Layers palette.
Dodging lightens the underlying image; the lighter the upper layer is, the more it lightens the bottom layer. Because the two layers contain opposite versions of the same image, they cancel each other out. The results will be pure white, or nearly so.
6) Apply Gaussian Blur
To get some interaction going between the layers, you blur the inverted, Color Dodge layer slightly.
I prefer Gausian blur in almost all things and it usually gives me the best results here, too.
Select menu: Filter > Blur > Gaussian Blur.
As you drag the slider to change the blur amount, the pencil sketch will begin to appear. The amount of blur you need depends on your particular image. I used a setting of 3.8 pixels here.
Figure: gaussian blur 2 px (A Gaussian blur of 2 pixels applied)
Figure: gaussian blur 8 px (A Gaussian blur of 8 pixels applied)
Figure: gaussian blur 3.8 px (My actual blur settings of 3.8 pixels applied)
The greater the blur, the wider and darker the lines and shadows will become.
The Motion Blur, Radial Blur, and Blur More filters give nice results too. It depends largely on the image at hand and your personal tastes.
At this point, you can try changing the layer blend mode from Color Dodge to Linear Dodge. It's up to you which looks best. Figure: linear dodge mode
7) Burn and Dodge to taste
You can stop here, or you can use the Burn and Dodge tools to selectively lighten and darken areas.
Burn and Dodge on the upper, inverted, layer, not on the background layer.
In this example, I burned the shirt fairly heavily to recreate its original dark color, and I dodged the background to remove unwanted texture there.
Figure: plus dodge and burn
8) Add some texture
You can also create a touch more realism by adding some texture with Layer effects.
In the Layers palette, right-click on the upper, inverted photo layer, and choose Blending Options from the pop-up list.
When the Layer Style dialog appears, select Pattern Overlay.
Still in the Layer Style dialog, set the Pattern Overlay's Blend Mode to Overlay, which will confine the pattern to the darker areas of the image.
Choose a dark, neutral pattern such as Oil Pastel on Canvas (in Artistic Surfaces), Stucco (in Patterns 2), or Shingles (in Texture Fill 2). Experiment with scale and opacity to find the look that best fits your image.
Figure: plus texture overlay.
Note: If you hide (or delete) the Hue/Saturation adjustment layer, the results resemble a colored pencil sketch.
Figure: minus Hue/Saturation adjustment
Remember to experiment with different settings in the blur phases, and make sure to try other textures and texture depths for a wide array of striking effects. Try other images too, like flowers for Mother's Day, or Western scenes for Father's Day. Print this to a slightly textured paper, and your colored pencil drawing is ready for that book cover or menu... or for framing as a gift to the grand parents!
That's all there is to it. Have fun, and let us know how it turns out!
Mark
(Contact Mark through the DTG Contact page!)
Article and photos copyright 2004, Mark Clarkson, All Rights Reserved
Although cheap web hosting deals can be tempting but for dedicated servers you need to go for quality. Some of the wireless internet providers also cover web hosting packages.
 Folks, you seriously want to check out Mark's Photoshop Secrets of the Pros: 20 Top Artists and Designers Face Off . It will be one of the more satisfying Photoshop reads you've had in a long, long time.
Photoshop Secrets of the Pros takes you on a thrilling ride through the brains and studios of the 20 Top Artists and Designers as they Face Off, competing mouse to mouse in heated Photoshop battle.
It's fun and enlightening as you learn through some rather exquisite digital art. You'll love the chapter The Secret Life of Photoshop Designers and relish in Real Designers Do Less, Get Paid More.
Here. Take a look at "Match 5: "Contamination": Audrey Mantey vs. Joen Asmussen" in this downloadable PDF chapter (1.96MB) from the book!
Return to the Photoshop Department, or the Design Center Main Index
Participate in your Design Center
Lots of fun and information for all... don't forget, any community is only as good as the participation of its members. We invite your tips, tricks, comments, suggestions and camaraderie.- Ask for the DT&G Monthly: to receive DT&G newsletter each month, happenings in the Design Center and regular columns like the "Mail Bag" and "Cool Sites"
- SUBSCRIBE : to the Designers' CAFE email list
- Link to this site, and then show us the link. We'll send you any of our current door prizes, just for your trouble.
- SUBSCRIBE: to the Web Design & Review email list
- SUBMIT: a news link, new font, or product review
- SUBMIT: a link to a Photoshop web site


