
Quite often we get calls to the Photoshop 911 hot line wanting to know how to make those nice gradual gradient edges to photos. Most of the time people call them "fogged" edges. Whatever name you give them, feathering is what you want to use...
The Gentle Art of Feathering
Images in Photoshop
We've talked about feathering before, particularly in our "White Out" article, and in our recent article on the assembly of pictures to tell a story in photo montaging. The techniques we've been using are masking, and feathering. As promised, here's a downright crafty way to crop and feather those photos.
 Feathering is today's software term for the traditional technique known as vignetting: a soft edged border around an image which blends into the background. You can make this any shape you like, but we'll use an oval here because it is appropriate to the subject matter.
In traditional photography this is done in the photo enlarger while a print is being exposed. The exposure time would be extended, and the lens opening for the enlarger closed down so that the print exposure could extend long enough for the technique. The photographer would cut the vignette shape in a piece of black card stock slightly smaller than the size needed for the photo. He would then hold it just above the print paper surface during the exposure and gently move it in a circular motion. This would mask the surrounding areas while exposing the photo to the paper. The circular motion created the vignette. The more motion, the foggier the edges. It's similar to "burning in" an area of the photo.
Feathering in Photoshop
 This works equally well in all versions of Photoshop. It's really quite simple.
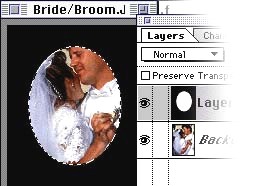
First pick the right crop. In this method we black out the background of our cropping layer rather than drawing a ring or selection around it. This allows us to experiment with the oval shape and move it around for the perfect crop.
Draw your oval using the ellipse marquee (tap M) making the selection active on a new layer. Invert the selection so you can (option-delete) fill the non-print areas with black.
TIP: You'll remember that clicking on the Selection tool with the option key converts it into an oval/circle tool.
At this point we use the move tool (tap letter "V") and move the whole layer, dragging it around to find the crop that pleases us most. Notice here we've moved the oval up to show more of the groom's face, and frame the couple more pleasingly.
As in the use of the Crop tool, you can set your layer Opacity lighter (See: Opacity slider in the layers palette) so you can see the areas of the photo to be cropped or "feathered out".
If you like you can hide the racing ants of the selection at any time by hitting Command (Control)/H. This command toggles the active selection ("racing ants") on and off.
Making the Feather
 Under the Selection menu you can set the amount of feathering you wish. (In this case we set it to 10 since the image is a low-res photo, and it's very small.) Higher numbers, mean wider the spreads of feathering. You can also set the amount of feathering by using the Options bar text entry field for "Feathering" (In PS versions 6, 7 and CS)
At this point if you wish to test your feather just click the QuickMask button. (Or, tap the letter Q in Photoshop versions 4 through CS.) Now you can see the feather in action. If you want an even more clear demo, double-click the QuickMask button in the tool bar (just below the Colors chips) and in the QuickMask dialog set the mask color to white, and the Opacity to 80 to 90%. I don't usually set to 100% because I like to see a little of the photo as well.
Always remember that the amount of feathering or 'blur' you assigned will be centered at the active selection. In other words, in our example of a 10-pixel feather, 5 of the pixels are inside the oval, and 5 of the pixels are outside the oval. Keep this in mind when you first draw your oval. In larger, higher resolution images it's not unusual to have 20 to 30 pixel feathers.
Once you're satisfied you can commit your vignette to file. First, click the New Layer button in the Layers Palette so your vignette won't disturb the original photo.
Now, set the foreground color to the desired color -- in this case we used white, then fill the current selection by hitting Option/Delete (Alt/Delete). The background fills with white, and the photo becomes nice and softly vignetted or feathered.
Always remember, you can SAVE the selection for re-use by choosing the "Selection" menu: and selecting "Save Selection". You can also convert the active selection to a quick mask by clicking the 'Quickmask' button in the tool bar or, by tapping the letter "Q". Once in Quickmask mode you can add or subtract the amount of opening by painting more masking into it. White paint adds to the opening, and black paint subtracts from the opening, and adds more mask.
Variations with shapes
 For this photo montage, there are a number of ways we could experiment with feathering for similar effects. In this case, however, we had already designed how we wanted the image to finish. So, feathering becomes a quick and easy route to the results.
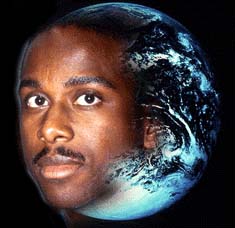
Since the face needed to sort of grow out of the globe, an irregular feather seemed to be the best way to go about the project.
Remember: Selecting the right photo is important to your montage. Obviously, here, any other positioning of the head would have been uncomfortable in the montage effort. Size, shape, tilt and attitude are all important considerations when choosing photos.
Human hand...
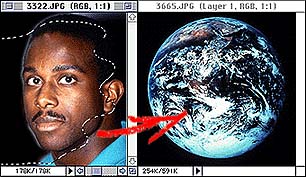 This time rather than an oval or rectangular vignetting shape, we took the lasso tool and drew a rough shape where we wanted the transition to take place.
Setting the feather 8 pixels, tap "V" for the Move tool, then drag the selection into the photo to be montaged. This gives you a hand drawn effect resulting in a more casual blend from the face into the globe.
If we made a simple blend shape, using the blend tool and a layer mask, it would be rigid, and rather machine looking. The ragged vignette has a nicer hand.
Think about these selection methods next time you're working on composite photos. Sometimes that bit of raggedness makes your art more human... and, of course, more friendly to the viewer.
Send us your masterpiece photo assemblages so we can all enjoy!
For more advanced procedures see our "White Out" article, and in our recent article on the assembly of pictures to tell a story -- photo montaging.
And that wraps up another case study from the emergency calls at Photoshop 911 dot com. To see more case studies, and tips generated from Photoshop911 just go to our Tips & Tricks department.
Return to Photoshop Tips & Tricks, or the Design Center Main Index
Participate in your Design Center
Lots of fun and information for all... don't forget, any community is only as good as the participation of its members. We invite your tips, tricks, comments, suggestions and camaraderie.- Ask for the DT&G Monthly: to receive DT&G newsletter each month, happenings in the Design Center and regular columns like the "Mail Bag" and "Cool Sites"
- SUBSCRIBE : to the Designers' CAFE email list
- Link to this site, and then show us the link. We'll send you any of our current door prizes, just for your trouble.
- SUBSCRIBE: to the Web Design & Review email list
- SUBMIT: a news link, new font, or product review
- SUBMIT: a link to a Photoshop web site