

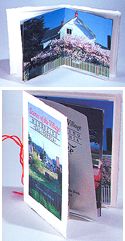
Single-Sheet 16-Page Gift Book
By Fred Showker
This used to be one of the favorite layouts from my "Creative Layout" seminars, and I know you all probably are all ready familiar with this technique. However, for our 2003 Holiday issue, I thought I'd add a little twist - how about a picture book from the year's digital photos for a gift? Everyone loves photos, and by using a little creativity and a little planning you can make a superb photo album. It goes wonderfully with our "Creative, One-Of-A-Kind Envelopes" article.
Simple concept
 This is based on a single 8.5 x 14, legal size sheet. You can pick up packs of
legal size paper in a surprising array of colors, textures and finishes.
The book is simple to make once you have your pagination guide. (Which we'll supply for
you later in this tutorial.)
This is based on a single 8.5 x 14, legal size sheet. You can pick up packs of
legal size paper in a surprising array of colors, textures and finishes.
The book is simple to make once you have your pagination guide. (Which we'll supply for
you later in this tutorial.)
Then it's a simple matter to first print the booklet -- then turn the sheet over, print the back side -- then cross-fold, turn, cross-fold, turn and cross-fold again forming the book. A quick trim and a quick stitch and you've got a real winner. It takes so little time, you could make a half dozen in an evening. It will take more time to design, and create the cover.
Conceptualizing
When you look at a well-designed publication, there is usually one dominant feature to catch your eye -- and then a continuing theme that holds the pages together. The whole idea is utilizing photos or art that would normally be viewed separately -- brought together into a book.
As you go through the year's digital photos, ask yourself how you can weave in a story. Don't just make it a travel log of your vacation or the kid's birthday party, give it meaning beyond the 'sum' of the photos.
Gather content materials
You shouldn't worry about the mechanics or details of the book yet. While working on a concept, just pull the favorite and best photos. Look for opportunity in the photo like pointing devices, personality or facial expressions. There are lots of themes that can be used to tie together otherwise unrelated images...
- Cooking and eating
- Outdoor gatherings and events
- Cars and transportation
- Colors... look for a color theme
Begin fitting and positioning
Here's where it gets fun. Don't just arrange the images in the book according to the calendar or other set themes. Look at your photos and see how they visually flow from one to the next. Remember you'll be seeing "spreads" -- so look for picture pairs that work together and can compliment each other. Don't be afraid to experiment with multiple images per page, flips, flops, rotates, and various other design techniques. Mundane photos can be extra special with a little digital help, or when working in tandem with another image.
If you are using iPhoto on a Mac, you know iPhoto library keeps all your photos safe. However, for a project like this you may want to organize them into an album.
Mechanical tips
Don't plan to print on photo grade paper -- it won't fold properly, and it's glossy on one side only. The only way to use glossy grade paper is to trim out each photo and affix it to the pages of the book. You can do that -- but you'll lose the feeling of a book, and to the viewer it will be more like a scrap book.
Printing on heavy paper is best. But regardless, look at the paper's opacity. You want to avoid any show-through.
Although you can do some nice juicy photos full size, filling the whole page or bleeding off the page, take care. Remember that particularly with inkjet printers you'll be putting down a lot of ink. Test the paper first to see how saturated it becomes. You may run into trouble when attempting to print the second side. For this kind of project, I recommend not doing bleeds for full coverage.
Preparing the photos
Scale, prep and proof your photos individually. Don't waste paper and ink proofing entire photos -- use samplings. (See below.) When going for the final prep, make sure they're all scaled to fit the print area, and are all at the same resolution.
Prepare your photos in pairs according to spreads. That's where you'll want the photos to look like they go together.
Test print the photos. For optimum printing experiment with turning the saturation down a bit. You don't need to print the whole photo to test this. Take a one-inch or so "sample" from the photo -- from an area of high saturation. Test it. If you then modify it to print again, just move the image into an unprinted area of the page and print by feeding the same sheet through again. You may even want to make small notes next to the sample on color settings, etc.
Two important printer tips
Make sure to specify the paper you are printing on in your application's Page Setup dialog box. You will find that your printer has already profiled how the inks will behave on various papers.
Make image resolution work with the printer's resolution. Factor image resolution so it never falls below one-third the resolution of the printer. Since it takes three dots to make a color, higher resolutions will result in less quality. Since the page sizes of our booklet are small, you'll be able to maintain good, crisp images without increasing resolution.
Bringing it all together
Once you've fine-tuned your story line and image sequence, it's time to begin book assembly.
I strongly recommend you make a "dummy" of the booklet, and then note each photo on its page. After that, it will be a simple matter of bringing the photos into the template and positioning them in the correct spot. Remember that since you're working in pagination, some of the images will not be next to or across from the other photo in the spread. So take your time and make sure they are on the right pages.
Work on one side of the sheet first, then rotate it and work on the other side. Don't try to place images into the pages that are upside-down. (See a sample the template for side one, and another for side two.) The pages labeled upside-down need to be positioned as such. So, your art will ultimately need to be rotated 180-degrees for the pages along the top half of the page. Save the file frequently during production.
Once you have a flat ready to print, print in draft mode just to "proof" your pagination. On that proof make a note on how it exited the printer. Mark on the print the direction and orientation of the print in the exit tray. You'll need this to properly insert the page for the next print.
Once it's exactly the way you want it print several pages -- two or three more than you'll need -- and set them aside to dry completely. While they're drying, finish the second side of the sheet.
From a sheet to a book
Once you've printed both sides of the sheets, and they've completely dried, it's time to fold one. Make sure your hands are clean and dry.
If the paper is particularly stiff, you may need to score. Score carefully with an un-serrated table knife. Score carefully.
- Fold #1: Page 11 to Page 10
- Fold #2: Page 13 down to page 12
- Fold #3: Center spread closed.
On to binding
At this point if you've printed a separate cover, score and fold it then nest your booklet inside the cover. Now you can stitch as you please -- either staple or by stitching with a needle. Many times the book will be more festive and creative if you stitch with some colored yarn or even thin ribbon. The more decorative you make the stitching, the more "special" the book will be.
Need a little help?
In this article I've basically just skimmed the surface. There are lots and lots of variations on such a theme. If you really need some expert help -- and some creative inspiration -- then go take a look at Janet Ashford's wonderful "The Arts & Crafts Computer Book" which includes full instructions for making beautiful projects like this.If you order today, you'll have it in time to make your booklet extra special!
Above all, make it fun
There's nothing so rewarding to give or to receive than an art object you've made. In the case of our "Pocket Book" this will become a treasured keepsake for sure. Don't forget to print a few extras -- you'll be wishing later you had them.
And by all means have a great holiday season
Thanks for reading
![]()
Return to the Design Department, or back to the Front Page
Participate in your Design Center
Lots of fun and information for all... don't forget, any community is only as good as the participation of its members. We invite your tips, tricks, comments, suggestions and camaraderie.- Ask for the DT&G Monthly: to receive news about DT& headlines, happenings in the Design Center and regular columns like the "Mail Bag" and "Cool Sites"
- SUBSCRIBE : to the Designers' CAFE email list