

Personalized, One-of-a-kind Envelopes
As we launch our holiday issues this year, I'd like to do two things. First I'd like to inspire all of you to do some hands-on graphic arts. I think we all have a tendency to sit behind that computer monitor too much and deprive ourselves of the pleasure and good feelings of making something by hand."Oh, Fred, I don't have any skills or talent to do that!"Yes, I hear that a lot... but you're wrong! No skills or talents are involved -- just a desire to make something meaningful. Here, join me in an adventure in making very cool custom envelopes...
Getting started
I've promised to share this technique for some time, and finally decided to put it into an article.One of my clients, Solace makes some spectacular custom stationary items from hand made papers, and marbled papers. The problem is all the sizes were rather custom, and the hand cut envelopes really needed a little extra umph to get a polished, professional look. While these items sell well, they are high ticket items and need to look the part. What they needed was an envelope pattern for making commercial quality envelopes very quickly by hand.
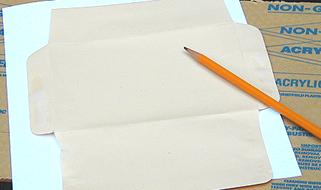
 It's really very easy, and you can churn out an envelope faster than you ever imagined. It starts with the envelope you plan to use. For our example today I selected a standard #5 Baronial. I like this size because it cuts evenly out of an 8.5 x 11 sheet of paper, (for those of you who want to generate custom images on your printer), and it fits many standard size cards, card blanks and even fancy embossed paper goods.
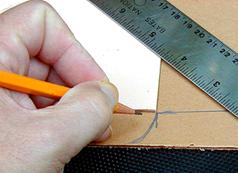
Carefully take the envelope apart, flatten and trace it onto the paper liner of an eighth-inch of acrylic. I use non-glare acrylic because it's easier to see than the perfectly clear kind. I like acrylic because you can see the image through it, and move the pattern around to position the image for the envelope.
Make the Pattern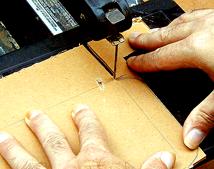
Once you've accurately traced the real envelope onto your acrylic, you need to cut the shape out. I used a table saw to rough in the shape, and create the straight edges. Then we moved it to a dremmel hobby saw (jig saw, or band saw) to do the detailing, rounded corners, and angles.
Once the shape is cut out, a sander or sanding block dresses up the edges. Be sure to knock off all the sharp edges, and round all the corners.
Handle it carefully until you get it smoothed and rounded -- freshly cut acrylic can cut or gouge you just like broken glass.
The Finished Pattern
After peeling the liners, you're presented with a nice, flat envelope shape in acrylic.
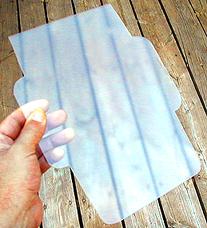 This acrylic is actually clear, with a very slight texture on one surface. This texture makes the acrylic "non-glare." (For the photo, I turned it to pick up a flat sky reflection. Otherwise it wouldn't be 'seen' in the picture!) We like the non-glare better because it helps you 'see' the pattern while seeing the art behind it.
Careful sanding and perhaps the use of a file will remove sharp edges and corners that could snag your envelope material. Rounded edges will also cut much faster in the cutting steps...
Next, let's make an envelope
Return to the Design Department, or back to the Front Page
Participate in your Design Center
Lots of fun and information for all... don't forget, any community is only as good as the participation of its members. We invite your tips, tricks, comments, suggestions and camaraderie.- Ask for the DT&G Monthly: to receive news about DT& headlines, happenings in the Design Center and regular columns like the "Mail Bag" and "Cool Sites"
- SUBSCRIBE : to the Designers' CAFE email list