Alien Fixes Photo Faux pas
enlarging digital photographs in Photoshop for printing...
Faux pas is a French term meaning literally "false step" -- which is exactly what happened here.
What a great project for the season! A calendar fund-raiser for the local Children's Museum. Thanks to master photographer, Allen Litten, many lessons were learned about taking photos that people will enjoy in a calendar! Kids got to bring their own cameras, or cameras provided by the Children's Museum.

Everyone had a great time taking photos in teams, all throughout the year. As production time approached, the calendar committee -- fifteen, ages 9 to 14, began cataloging thousands of shots taken, voting on the ones they liked best. This is where I became involved.
I was happy to be invited to participate, even though it was a bit of work to get the calendar ready to go to the printers. A production team was built of volunteer kids who were interested in the graphics and publishing aspects of the project. We ended up with six team members... good! Each team member had two months to produce.
Kids these days! Boy if you ever doubt the capability of the next generation, just work with a team of 4th to 9th graders on a calendar printing project! Wow -- these kids are perceptive and smart! They kept me hopping just to stay one step ahead of them.

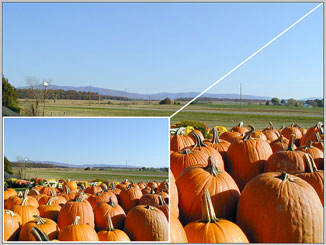
As we went into production, the selection process for the photos was complete, except for October. There were some differing opinions of which photo should be selected. After some discussion, they decided on the "Pumpkin Patch" as the photo for October -- great choice -- that is, until I found out the photo had been taken at a lower resolution than we needed to print a top quality calendar.
OH NO!
 The photo had been taken at 72ppi, and what we needed was a finished size of 10.5 x 7.8 inches at 300 ppi. We were in trouble. In order to get the size and porportions to work, I would need to increase the resolution.
Digital Camera Lessons
Everyone learned some important lessons that day.
First: Lock in the settings. Check your camera's set-up software, usually visible in the on-camera display. All cameras I've seen, Olympus, Nikon, Canon, Epson, HP, and others, include a set-up mode that keeps all settings until the next time you change them from that set-up menu. Then, no matter what settings you change on the fly, the camera returns to these all important settings. If you don't click the "keep settings" then the camera will return to default!
Next: Shoot at the highest resolution! Most amateurs will keep their cameras at a small resolution size (pixels by pixels) and shoot at 72ppi (that's "pixels per inch") just so they can get the most number of shots on their memory card.
Well, that's all good and well until you have to have the image printed -- whether professionally or on the home inkjet. Hey -- memory cards are cheap these days! You can get a one-gigabyte card for under $75. Check the sales in your local paper -- you'll find them for $39 to $59! So there's no excuse for shooting at low-rez! When setting up the camera, go for the highest resolution the camera will shoot. You can always reduce later.
My Canon Powershot S70 is an 8 megapixel shooter that ranges from 640 x 480 at 72ppi to a whopping 3072 x 2304 at 300ppi, yielding roughly 7.1 million effective pixels. Yes, it sounds excessive. But at the highest setting I can inkjet print 11 x 14 photos with little or no pixelation. With a one-gigabyte memory card I can usually get 80 photos. But this is a three-year-old camera. So today's cameras actually do much better -- and a new 14 megapixel camera was just announced this month! (My Canon is a fantastic pocket-camera! I recommend them highly.)
Read the book! Reading your camera manual will explain all of the above and much more. It will also give charts of how many shots you can get on various memory cards, at various resolution settings. Read it, and then set it for the highest resolution. Buy another card with lots of capacity and you'll thank me later!
But what happens next? We'll blow up the image to work
Return to: Photoshop Tips & Tricks, or the Design Center Front Page
Participate in your Design Center
Lots of fun and information for all... don't forget, any community is only as good as the participation of its members. We invite your tips, tricks, comments, suggestions and camaraderie.- Ask for the DT&G Monthly: to receive DT&G newsletter each month, happenings in the Design Center and regular columns like the "Mail Bag" and "Cool Sites"
- SUBSCRIBE : to the Designers' CAFE email list
- Link to this site, and then show us the link. We'll send you any of our current door prizes, just for your trouble.
- Help Support The Design Center: with your donation, we say thank you with free books, listings, and even links on the front page!
- SUBMIT: a news link, new font, or product review
- SUBMIT: a link to a Photoshop web site

