

Alien Fixes Photo Faux pas
enlarging digital photographs in Photoshop for printing...
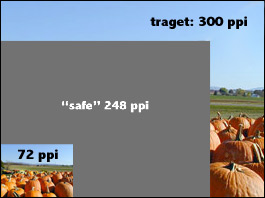
As we've all been taught, you can always reduce a digital image with excellent results -- but never enlarge a digital photo because the quality will be less than desirable.
After some discussion with our pre-press guru at Good Printers, Inc., we learned that we could probably squeak by with a minimum of 240 ppi. This would still be a challenge.
 But I remembered back to a review I had posted some time ago about Alien Skin's new Photoshop Plug-in called Blowup. If ever there was a time to put this software to test, it was now.
As mentioned before, we would have to go from 72ppi to at least 240ppi. Luckily, the software was still installed from when I previously tested it for the news item. I searched for the box, to find some instructions, but alas, it had evidently grown legs and walked away. This would have to be seat-of-the-pants.
The Alien Skin Blowup Interface (diagram) is easy enough to understand. Basically, there's an edit menu and the all-important "help" menu. (A) The large window (B) is the preview window that is set to a 100% view of the target resolution. Here, you can check for clarity and sharpness. (C) shows the existing size of the image, and (D) allows you to set the actual dimensions you need for real-world printing. It's a good idea to click on (E) so you'll be modifying a copy of the image, saving the original for a backup. You can also adjust the sharpness and grain. (F and G)
I hit Okay and off we went. It took some time -- maybe a minute -- to render the new version, and at close examination, it looked great. But the true test would be the printed sheet. The pre-press tech at Good Printers assured me it would be okay. I was nervous.
Off to the Press Check
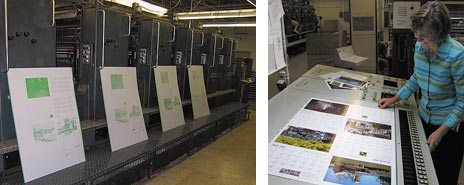
 The Children's Museum director, Lisa Shull (above right) and I arrived at Good's just as the first flat was in production.
That's a 6-color Heidelberg press, with press-ready plates lined up at each color station.. At the business-end of the press, sheets were ready for close inspection. (Here's Lisa proofing the first sheet.) Everything was running smoothly. At this end, a control panel allows the print technicians to adjust precision settings for each of the four printing heads. The press can run at up to 10,000 sheets per hour. Quite an operation.
The proof: Yes, Blowup works!
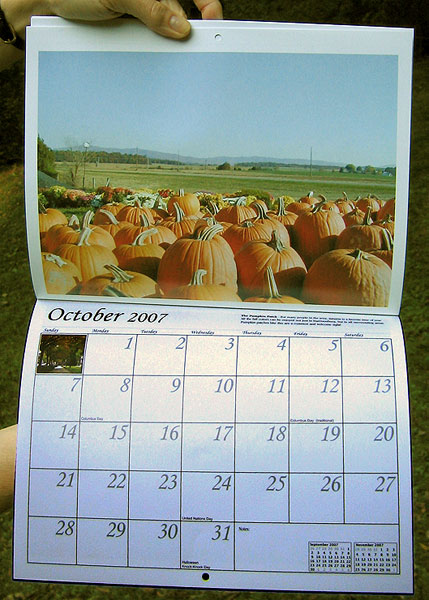
Gathering the finals, a quick look at the October page gave me real proof that Alien Skin's Blowup really does work. At right, you'll see the photo printed with all the fidelity and crispness of the other photos which were from 280 to 300 ppi. Color is good, and the calendar is ready for the Museum's fall fund-raiser! With more than 1,500 pre-sales by calendar committee members, it is sure to be a success!
Digital Photo BlowUp -- you can enlarge jpg files!
Alien Skin Software's BlowUp, an all-new plug-in for Adobe Photoshop and Photoshop Elements, works wonders for both photographers and graphic artists, BlowUp offers a high quality image enlargement that would take hours and hours of manipulation and testing in Photoshop. Yes, there are methods of doing it yourself, but at the modest price, BlowUp simplifies the process and actually pays for itself. In my experience, it actually improved the image enlargement, making it easy to convert the lower resolution photo to print quality. You can read my previous post about Blowup, or visit Alien Skin to discover it yourself.
Happy printing!
![]()
Return to: Photoshop Tips & Tricks, or the Design Center Front Page
Participate in your Design Center
Lots of fun and information for all... don't forget, any community is only as good as the participation of its members. We invite your tips, tricks, comments, suggestions and camaraderie.- Ask for the DT&G Monthly: to receive DT&G newsletter each month, happenings in the Design Center and regular columns like the "Mail Bag" and "Cool Sites"
- SUBSCRIBE : to the Designers' CAFE email list
- Link to this site, and then show us the link. We'll send you any of our current door prizes, just for your trouble.
- Help Support The Design Center: with your donation, we say thank you with free books, listings, and even links on the front page!
- SUBMIT: a news link, new font, or product review
- SUBMIT: a link to a Photoshop web site