


Ladies and Gentlemen, we welcome Tim Shelbourne back to the pages of Photoshop Tips & Tricks to share more of his Photoshop expertise! Welcome Tim, and thank you so much for sharing this tutorial...
Hand Tinting a Photograph with Photoshop
[Editor's Note: Folks, this continues to be a frequently asked question at Photoshop 911, and this is the best tutorial you're going to find on the topic! When we saw this technique in the Photoshop Photo Effects Cookbook we knew at once we had to share it with you! Thanks to O'Reilly Publishing we're able to bring the technique to you in its entirety! ]
Tim Shelbourne writes...
Traditional Photographic Effects
 Before the age of color film, when black-and-white photography was the only option, it was common practice for photographers to tint a black-and-white image with colored dyes to mimic real-life colors.
Although we now have all the advantages of stunning color photography, we can still use Photoshop to replicate this technique, and add great charm to black-and-white images.
What we're looking for here is not truly lifelike color, but a decorative and subtle effect. Essentially, we can tint as little or as much of the image as we like, but the effect works best where areas of color are contrasted with the uncolored grayscale image.
 Here's how...
* Open a suitable image.
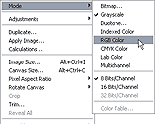
* Go to Image > Mode.
If the original image is in color, first convert it to grayscale.
Then convert it back to RGB so we can add color back into it. If the original is grayscale, it'll need to be converted to RGB mode.
The color needs to be painted onto a separate layer, so create a new layer (Ctrl/Cmd+Shift+N). Set the blending mode for this layer to Color in the Layers palette. This mode will allow any added color to overlay the image.
Choose the Brush tool and select a soft-edged brush from the Brush Picker.
In the Options bar, set the brush opacity to 50% and activate the Airbrush icon.
![]()
Hit F6 on the keyboard to display the Colors palette.
This is where we'll choose all of the painting colors.
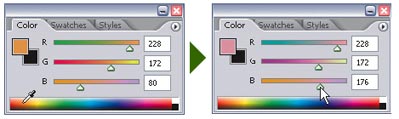
To choose a color, pass the mouse pointer over the spectrum bar and click to choose the approximate color. The colors can be fine-tuned with the RGB sliders above the bar, and the chosen color can be seen in the foreground swatch.
 Begin by choosing a warm yellow/orange.
Paint over all of the areas of flesh with this color. Remember, because the brush is in Airbrush mode, if we leave the brush in one position for too long the color will build up on the image, so we need to keep it moving at all times.
Vary the skin color slightly by occasionally dragging the RGB sliders. Remember, we only want to tint the image with color.
Now choose a deep brown and
paint over the hair of both dancers.
Again, modify the color and tone using the sliders to introduce a little variety.
I've chosen a light blue to paint over the male dancer's costume.
Essentially, we want less color over the lighter parts of the costume and heavier pigment over the darker parts.

To make accurate application of color easier, zoom into the image and adjust the size of the brush with the square bracket keys on the keyboard.
Article continues on the Next Page...
- This article is the exclusive property of O'Reilly Publishing and Ilex Press, Limited. © Copyright 2005 ALL RIGHTS RESERVED. All images are the exclusive property of Tim Shelbourne. ©Copyright 2005 ALL RIGHTS RESERVED
Tim Shelbourne worked for 20 years as a traditional artist and illustrator before converting to digital image making. Tim specializes in digital fine art and photo-manipulation using Adobe Photoshop, Illustrator, and Corel Painter. (consistently producing stunning Photographic Effects; Watercolor Paintings, Oil Paintings, special texture effects, and unique assemblages.) His tutorials are published regularly in Total Digital Photography magazine. (Back to top of article)
Also see:
Tim Shelbourne's Watercolor Effects from the Photoshop Photo Effects Cookbook - 61 Easy-to-Follow Recipes for Digital Photographers, Designers, and Artists (Download: 15 MB PDF Format)
Photoshop Blending Modes Cookbook for Digital Photographers with 48 Easy-to-Follow Recipes to Fix Problem Photos and Create Amazing Effects, By John Beardsworth ... Layer blending modes have been part of Photoshop for years, but they're not easy to understand at first glance. Sample Excerpt: Ultrawide Sharpening & Vibrant Mix (PDF Format)
Photoshop Retouching Cookbook for Digital Photographers with 113 Easy-to-Follow Recipes to Improve Your Photos and Create Special Effects By Barry Huggins ... tells you everything you need to know to adjust, correct, retouch, and manipulate your photographs-without making you first learn everything there is to know about Photoshop CS2. Sample Excerpt: Motion Blurring and Removing Skin Blemishes & Wrinkles (PDF Format)
Adobe Photoshop CS2
Upgrade price from Photoshop xx: $149.00
Upgrade price from Elements: $499.00
Photoshop CS2 full package: Save up to 30%
Return to: Photoshop Tips & Tricks, or the Design Center Front Page
Participate in your Design Center
Lots of fun and information for all... don't forget, any community is only as good as the participation of its members. We invite your tips, tricks, comments, suggestions and camaraderie.- Ask for the DT&G Monthly: to receive DT&G newsletter each month, happenings in the Design Center and regular columns like the "Mail Bag" and "Cool Sites"
- SUBSCRIBE : to the Designers' CAFE email list
- Link to this site, and then show us the link. We'll send you any of our current door prizes, just for your trouble.
- Help Support The Design Center: with your donation, we say thank you with free books, listings, and even links on the front page!
- SUBMIT: a news link, new font, or product review
- SUBMIT: a link to a Photoshop web site