Here’s another of those great tutorials in Adobe Illustrator from Ainsley Bevis. This time it’s a gift-wrapped icon, perfect for the holidays, birthdays, or where ever you need gift wrapping. This is the first of three, so watch this column for the next ones. For now, get started . . .
![]()

Special thanks to Ainsley Bevis from BloomWebDesign.net for sending in this great Adobe Illustrator tutorial! She covers a number of good techniques good for beginner to intermediate Illustrator users, and some of the tricks are sheer genious!
Ainsley writes . . .
Learn how to create a Christmas or Birthday inspired Gift Box in Illustrator using shapes, colour gradients and 3D options.

1. Getting started : Create a new document that's 600×600 pixels. Using the Rectangle Tool draw 2 shapes like below for the cover and box. (Enlarge)
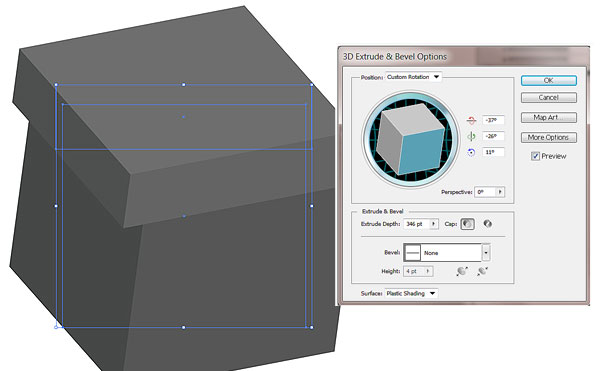
2. Extrude the 3D Shape :
With the 2 shapes selected go into
Effect > 3D > Extrude & Bevel.
Put in these settings (Open the 3D dialog)
3. Expand Appearance, Ungroup :
If the cover is slightly off move it in place. Next select the 2 box layers and go to
Object > Expand Appearance, then go to
Object > Ungroup (Shift+CTRL+G),
you'll need to do this several times to ungroup the shape.

NEXT: we’ll dissect the box and add gradients to begin colorizing our creations …

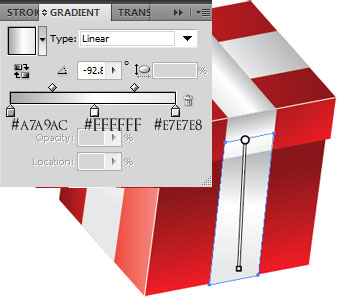
4. Applying Gradients :
Now select each section of the box and put in a red gradient. Use the Gradient Tool to direct where the light source is. For the Cover of the box use the second Gradient colours shown in this full size enlargement of the dialogs.
Note the white lines with dots at each end indicate the click-drag-release action of applying the gradients. The large dot indicates the start click.

5. Drawing Edges : Using the Line Tool draw 3 White Lines (2 pt) on the corners of the box.
NEXT: we’ll build the ribbons and wrap them around the boxes …

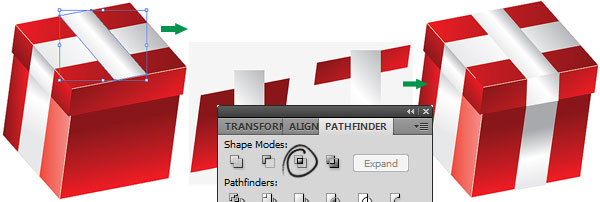
6. Draw the Ribbons : For this workflow, using the Pathfinder palette, open the diagram to follow the progression. Pathfinder Workflow Diagram
Using the Rectangle Tool draw a white shape for the ribbon on the left side of box. Make sure it's on the same angle as the sides of the box.
Hold down the Shift Key and select the ribbon and left side of the box and pull the 2 shapes out while holding down the ALT Key to duplicate. With the 2 duplicate shapes selected click on the Intersect Button in the Pathfinder window. You'll be left with the shape of the ribbon.
Repeat the process for the left side of the Cover so you have 2 shapes for the ribbon.

7. Ribbon Shapes : Put the 2 shapes on the Left Side of the box. Right click on the cover ribbon and Arrange > Bring to Front so it's over the other ribbon shape. (above left)
8. Set the Gradient : Next select each shape and put in a silver gradient. (above, right)

9. Repeat the process with the Cover and Right side of the box.
10. Duplicate : Place in the Silver Gradient on each ribbon shape.
EDITOR’S ALTERNATIVE : I think it’s fair to note here that as with most work there are any number of ways to accomplish the same goals.
Since this is an oblique drawing, the angles will remain the same throughout all straight edges. If you are handy with the Pen tool, you may find it easier to just duplicate one, fully styled piece of ribbon, as many times as you need it and adjust the width/depth using the Direct Select (hollow) pointer tool. (Tap A)
The only thing to remember is to drag ONLY the straight path edges — NOT anchor points, and then adjust the angle of the gradient as you change orientation of the shape. (Or, just drag a new gradient.)
I believe this might even be faster and easier to understand than Ainsley’s process above!
NEXT: we’ll put bows on the ribbons to finish the boxes …

11. Drawing the Bows : Elsewhere on the canvas draw the “Bow” shape (above, left) using the Pen Tool (you can use any colour). With the Fill to none and the stroke to 1 pt (again any colour) draw a curve shape on the previous shape. (above, right)

With the 2 shapes selected click on the Divide button in Pathfinder. This will divide the main shape. (NOTE: the dividing path must meet or slightly exceed the shape path you plan to divide, or the pathfinder won’t work. This is a common mistake, and people often ask why the Divide didn’t work.)

12. Decorate with Gradients : Select each part and put in a Gradient.
13. Duplicate : Create another loop section of the bow using the previous method.
14. Draw the Knot : Using the Ellipse Tool draw the knot using the Ellipse Tool and put in a Radial Gradient.

15. Expanding the Bow : Select the 2 ribbons sections and drag out while holding down the ALT Key to duplicate. With the duplicated shapes selected go to
Object > Transform > Reflect.

16. Send Behind : With the 2 duplicated shapes selected Right Click > Arrange > Send to Back and place it underneath the knot.
Place the Bow on the box and see how it looks.

NEXT: we’ll adjust our bows and then finish the boxes in color …

18. Adjusting the Bows to look more natural : Hold the ribbon on top of the gift box. To make the shape more Ribbon like, with all the shapes selected go to
Object > Envelope Distort > Make with Mesh
and put in the settings above. Do not be afraid to experiment, and remember to make each bow on each box a little different!
Click on the ribbon using the Mesh Tool and Warp the Ribbon.

19. Add the Shadow : Lastly for the drop down shadow, draw an oval shape using a dark grey, Right click the oval and Arrange > Bring to Send to Back.
With the shape selected go into
Effects > Blur > Gaussian Blur
and put in 71. If the shadow is too small you can select is with the Selection Tool and make it bigger. (How the Gaussian blur affects the art is totally dependent on the size of file.)
Experiment with different colours to create what you're after. Don’t forget to change the bows slightly on each different box for a more natural look, or create boxes of different sizes, but with the same size bows for variety. How about light colored boxes with dark color ribbons!

![]()
Special Thanks to Ainsley Bevis for sending in this tutorial. Be sure to visit Ainsley at BloomwebDesign.net
Ainsley is a passionate, and mostly self taught, Web and Graphic Designer based in Melbourne, Australia. As well as designing websites and graphic material for her clients she also enjoys playing guitar, piano, walking her dogs and cooking vegetarian food! Don’t miss all her great Adobe Illustrator Tutorials!
thanks for reading!
If you liked this tutorial and would like to see more, just send an email, or click the “SHARE” button below to TWEET it or SHARE it on your favorite networking site!
![]() Contribute your own articles in the Design Center,
Contribute your own articles in the Design Center, ![]() Join the Design Cafe forums,
Join the Design Cafe forums, ![]() Follow DTG on Facebook!
Follow DTG on Facebook!
This tutorial was originally published at : http://bloomwebdesign.net/myblog/2011/11/04/create-a-giftpresent-box-icon-in-illustrator/ then with permission, published here: https://graphic-design.com/wp-content/uploads/graphic-design.com/Photoshop/tutorials/gift_wrap/index.html