Vintage means “antique” or from a particularly fine year (when it comes to wines.) To be an “Antique” in the U.S. it has to be at least 50 years old. Except for automobiles, and that’s 25 years old. Much of the “vintage” simulations you see online aren’t really “vintage” but what someone thinks is vintage. In Europe and the Middle East, designers will use the term “vintage” just to get clicks, including any look from the 1970s, back to pre-historic. We’re thrilled to have Annabelle provide us with this poster design that seems to simulate a poster from the Art Deco period.
![]() OH NO … time for some Photoshop Madness — and a lot of people toss around the term “vintage” as if they know what they’re talking about.
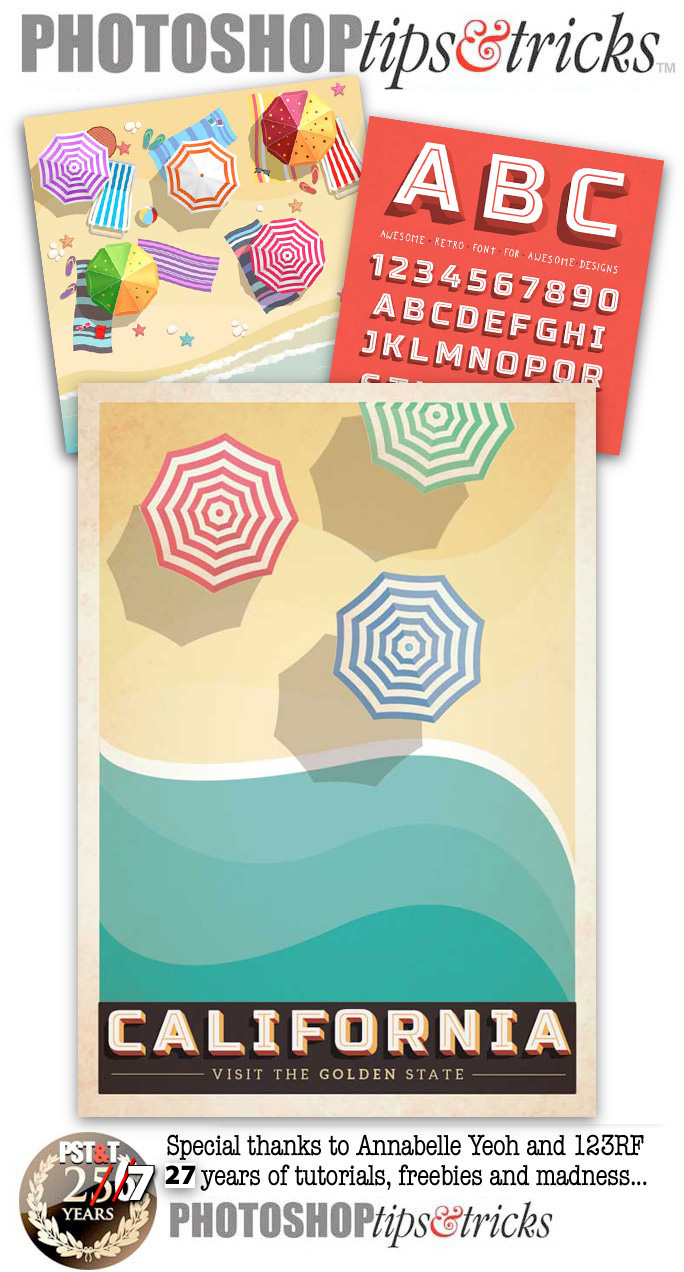
OH NO … time for some Photoshop Madness — and a lot of people toss around the term “vintage” as if they know what they’re talking about.  Vintage means “antique” or from a particularly fine year (when it comes to wines.) To be an “Antique” in the U.S. it has to be at least 50 years old. Except for automobiles, and that’s 25 years old. Much of the “vintage” simulations you see online aren’t really “vintage” but what someone thinks is vintage. In Europe and the Middle East, designers will use the term “vintage” just to get clicks, including any look from the 1970s, back to pre-historic. We’re thrilled to have Annabelle provide us with this poster design that seems to simulate a poster from the Art Deco period.
Take it away, Annabelle . . .
THE 1930s and 40s MARKED A GOLDEN AGE IN POSTER DESIGN, but the style is enjoying a huge resurgence in popularity right now. Striking graphics teamed with beautiful colors and strong typography give poster designs of yester-years a special and enduring appealing.
Ever wanted to recreate the vintage look on your own designs? Here, we take a look at the key techniques for recreating nostalgic styles, and look at some of the essential images and fonts you should track down to be able to create authentic-looking vintage posters digitally.

Your Essential Vintage Checklist
All vintage poster designs have common traits — qualities that make them look both authentically aged and of their time. You should keep this helpful checklist to hand whenever you want to give a retro feel to your designs.
- Texture — all vintage posters, whether authentically vintage or reproduction, have tons of texture that help the designs to feel older and less mass-produced
- Border — a slim border around your poster immediately gives the design a vintage feel
- Color — a well-chosen, muted color scheme is key to making a poster feel authentically vintage
- Layering — adding gradients and transparencies to elements on your poster will help the design to feel layered and rich in detail
- Stylized Illustration — vintage posters have style by the bucket-load, and quirky illustrations give a 1950s effect more easily than edited photography
- Type — typography is the cherry on the cake of vintage design. The right typeface will pull the whole layout together and give the poster the look of a particular era in time
Now let’s break down this checklist and take a look at each element in detail. I’ll use this contemporary poster design as a working example to demonstrate each point. The layout here was created in Adobe InDesign, which is a great choice for creating poster layouts for print.

1 Texture
If there’s one key secret to recreating vintage styles, texture would be it. Vintage posters look aged, with fading corners and visible paper grains and creases.
There’s no need to track down an authentically aged sheet of blank paper to print on — placing a paper image in the background of your design will make the rest of your design feel more tactile, even if you print onto crisp white paper stock.
At right you see our paper image which is perfect for the task. The beige tones of the image will add warmth, and the darkness around the edges of the image gives the impression that the paper has been touched more often on the outside edges over the decades.
You’ll find that a good paper texture image can be used for a ton of different design projects to add detail and interest, so it’s a sensible addition to your stock portfolio.
For this poster design, I’ve placed the paper image on the bottom layer in InDesign, extended the edges past the trim edge onto the bleed, and added a Radial Gradient Feather (Object > Effects > Gradient Feather) to bring a touch more lightness to the center of the layout.


2 Border
Modern poster prints tend to be printed with a bleed, which extends the poster’s color past the trim edge of the page, creating a border-less design. You’ll notice that most posters from the 1950s will have a slim border around the artwork, as the designs would not normally have been printed with a bleed.
Allowing for a slim border around the edge of your artwork will subtly help to give your poster an older look and feel. Let’s take a look at this technique in action.
First, I’ve downloaded a vector image of a beach scene.
It may look very modern as it stands, but I’m going to use this as a basis for lifting individual elements and applying vintage styles to them.
Open Adobe Illustrator, then Copy and Paste the sand background of the vector onto a different Illustrator document.

I then add more vector shapes in the same style to add more height, and set these in sea-colored swatches and tints, with a white curve of foam.

I can then Edit > Copy the whole vector, return to InDesign and Edit > Paste it directly onto the layout.

I’ve already added a margin of 13 mm around the edge of the page, which allows for just a little bit of the paper texture to peep out.
For the final (and very important) finishing touch, I apply a Multiply transparency effect to the pasted vector, which allows the paper texture sitting beneath to be slightly visible.


3 Color
Printing techniques have evolved in leaps and bounds since the 1950s. Digital printing now allows for a larger range of ink finishes and paper coatings, which makes colors appear more vivid and bright when printed. Look at a movie poster today and you’ll notice how strong the colors appear, whereas a vintage style will have colors that appear more soft and muted.
This isn’t to say that you can’t use strong colors on your vintage poster designs — primary colors like paintbox blue and cherry red look fantastic on retro layouts — but try to balance these with more muted tones. Apply percentage tints of color swatches to bring the strength of the color down, and avoid flashy neons or modern ink finishes like metallics.

Tones of teal, cream, grey and brown (rather than rich black) form the color basis of a great vintage design.
Adding a stronger pop of color on top of these, like these candy-striped parasols candy-striped parasols, will have more impact and feel decidedly more vintage in style as a result.

4. Layering
Although flat-style vectors are inspired by retro styles, your vintage poster designs will actually benefit from a touch of 3D-inspired layering. Adding shadows and layers of texture to the illustrative parts of your poster will help to give the design a hand-painted look, and add interest and depth to the layout.
Below, you can see how I’ve created contrast between the parasols and the flat beach design below by adding a shadow, set in a tint of brown.

Adding a Multiply transparency effect (Object > Effects > Transparency) to the shadows brings through some of the color and texture sitting beneath them.

See the results of the Multiply Blending Mode
The lesson here? Adding subtle layered elements like shadows, gradients and transparencies to an otherwise 2D design will not only make the design ‘pop’, but also keep it looking authentically vintage, not flat.

5 Stylized Illustration
Let’s take another look at that vector image of a beach scene. What is it about it that makes it look modern?
For one thing, the illustration style is too detailed and ‘clean’. The shapes and colors are too crisp and bright, and the shadows are too dark, which gives the illustration too much of a 3D effect.
When I lift one of the parasol vectors onto a new Illustrator document, I want to strip it down, removing excess shadow and detail to make the image appear more graphic and simple. This will make it appear more true to the illustrative style of the Fifties era.
You can see the original vector image on the left, and the stripped down image on the right. See the difference?


When using File > Place on the stripped-back parasol image, placing it into InDesign, make sure you layer it over the top of an image frame with the same parasol silhouette, containing a copy of the paper texture image. (Remember to save your images with a transparent background, as AI, EPS or PNG files!)
Once again, applying a Multiply transparency effect to the parasol vector brings the paper texture through. Ta-dah! A vintage-ready vector image.
So remember — keep your illustrations stylized, simple and bring in that all-important papery texture.

Your vintage style poster is ready for the final, and most important element, the typography. It’s technically not a poster until it “posts” a message — which is how the whole poster industry started. So, now, let’s go and add the typography to our poster!
NEXT: It’s time to add typography to your vintage poster
Continue to the next page . . .
Adding typography to your Vintage Poster
Now we’ll add the most important element, the typography. How you format the text on your poster really has the power to change the whole mood of the design. There’s a huge range of vintage-style digital fonts available, each inspired by different periods and micro-styles. Look for retro-style slab serifs for poster titles, which look fantastic set in uppercase letters.

Once you have a period (e.g. 1950s) and place (e.g. California, US), Google poster designs from that time and place to get a sense of which type styles were more popular and heavily used.
This geometric font might not be a typical hand-written Fifties style, but the text has a movie-inspired look that just feels right for a California travel poster.
I download the vector and Copy/Paste the relevant letters over onto a new document.

I bring in a bit of sunny yellow into the header (in Illustrator, go to Select > Same > Fill Color to pinpoint a swatch, highlight it, and be able to adjust it), save it, and then File > Place it into my InDesign layout.
Placed over the top of an off-black rectangle, the title really pops.

Look for more subtle retro typefaces for subtitles. You can find a range of classic fonts in your pre-loaded Adobe font library. Alternatively browse the 123RF library or free commercial-use font sites for retro- and vintage-inspired fonts. Here, I’ve opted for Aleo, a delicate slab serif which comes in a range of weights, to set the sub-heading (‘Visit the Golden State’).
Recreating vintage styles digitally allows you to bring a touch of nostalgic style to your designs. Balancing authentic-looking details with a strong visual design can be a challenge, but with this essential checklist to hand you’ll never be disappointed with the results. Let’s briefly review that checklist again…
- Bring in aged, papery textures as a backdrop to your designs
- Allow for a slim border around the edge of your poster
- Opt for muted colors and avoid brights, neons and metallics for an authentic Fifties color palette
- Build up layers of detail on your poster to create a balance of 2D and 3D elements
- Simplify your illustrations, making them appear more stylized and hand-painted
- Choose vintage-inspired typefaces to pull the poster design together and anchor the artwork in a particular time and place
Have you got any of your own tips for creating vintage-style poster art? We’d love to hear about them! Just drop us a quick note!
Thanks for reading . . .
Annabelle Yeoh,
Graphic Design & Photoshop Specialist
123RF.com
Special thanks go out to Annabelle Yeoh and 123RF in Hong Kong, for sending in this tutorial! 123RF is a royalty-free digital media library offering a wide variety of budget-friendly commercial and editorial images, video footage, audio clips, logo designs and illustrations. ![]() Original Post at blog.123rf.com
Original Post at blog.123rf.com
 But what ever you do,
Don’t let Photoshop Madness get you down!
There are always lots of spectacular Photoshop images and visuals out there! Share them! We’ll be back shortly with MORE Photoshop Madness … and please — BE CAREFUL WHERE YOU SURF … but when you do find a great Photoshop practitioner, or a good Photoshop tutorial, please share it with us! If you create Photoshop Tutorials yourself, please post your info here so you can be considered for a Photoshop Fave!
![]() See past issues of Photoshop Madness
See past issues of Photoshop Madness![]() Legacy Photoshop Tips & Tricks web site!
Legacy Photoshop Tips & Tricks web site!
Don’t forget … we encourage you to share your discoveries with other readers. Just send and email, contribute your own article, follow DTG on Facebook!, or Meet up with Fred at ![]() +FredShowker
+FredShowker
Please share your discoveries with other DTG readers:
![]() Send an email to our editorial staff
Send an email to our editorial staff![]() Contribute your own article
Contribute your own article![]() Follow DTG on Facebook!
Follow DTG on Facebook!
The original version of this page was published at : https://graphic-design.com/wp-content/uploads/graphic-design.com/Photoshop/1703_Vintage_Poster_Tutorial/index.html.