Getting ready for the summer vacation and all of the cook-outs, receptions, parties and picknics going on, we were delighted when Ainseley Bevis sent in this Adobe Illustrator tutorial with lots of blends, gradients and vector cooking!
![]() Getting ready for the 4th of July and all of the cook-outs, receptions, parties and picknics going on, we were delighted when Ainseley Bevis sent in this Adobe Illustrator tutorial with lots of blends, gradients and vector cooking! Ainseley writes:
Getting ready for the 4th of July and all of the cook-outs, receptions, parties and picknics going on, we were delighted when Ainseley Bevis sent in this Adobe Illustrator tutorial with lots of blends, gradients and vector cooking! Ainseley writes:
 In this tutorial I’ll teach you how to create a scrumptious Cupcake with Chocolate Frosting and a cherry on top! We’ll be creating this cupcake in Adobe Illustrator with various shapes, tool, a custom brush and Effects.
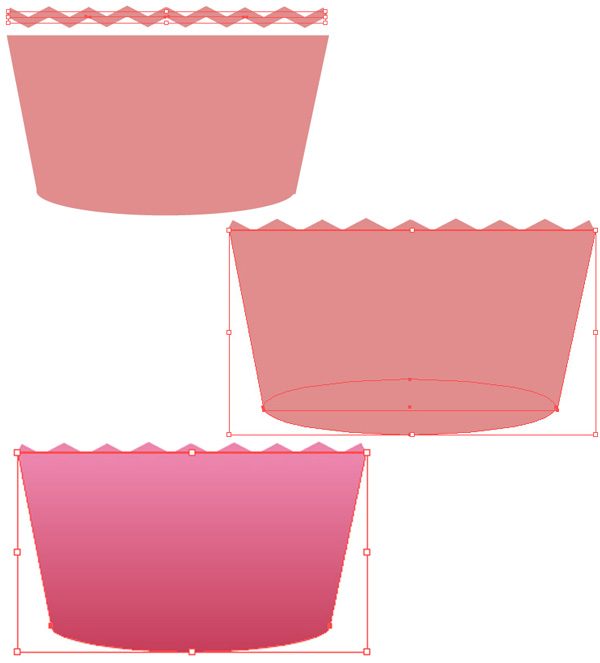
Cupcake Cup
1. Create a new document that’s 600×600 pixels. Using the Ellipse Tool, draw a thin oval shape for the of the cupcake cup. Next using the Pen Tool, draw the main part of the cupcake cup, drawing from the sides of the oval. Select the 2 shapes and click on the Unite icon in Pathfinder to turn the 2 shapes into 1.

2. Using the stroke settings below, draw a line using the Line Segment Tool while holding down the Shift Key (to keep the line straight). With the line selected go into Effect > Distort & Transform > ZigZag.

3. Duplicate the line by selecting it and dragging away while holding down the ALT Key until it fits the length of the cupcake cup & place it on top. Select the main cup shape and put in a gradient of your choice. While holding down the shift key, select the zigzag lines and make them the same colour as the last bit of gradient colour.
NEXT: Let’s put some cake into the cup . . .
Cupcake Sponge
4. Using the Ellipse Tool, draw a shape like below for the cupcake. Right click on the shape and click Arrange > Send to Back so it’s behind the cup.
Cupcake Frosting
5. Using a dark brown, draw the chocolate frosting using the pen tool.

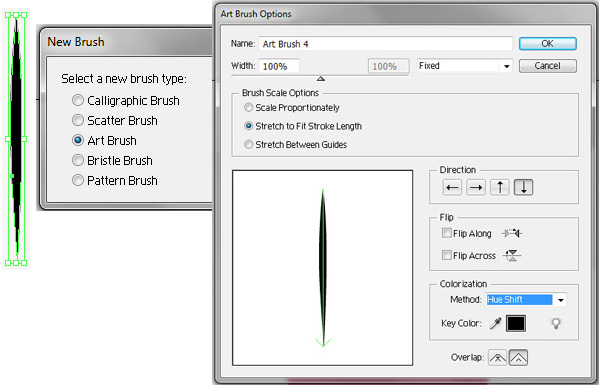
6. Elsewhere on the canvas, with the pen tool, draw a think shape like below. With the shape selected click on the new brush icon in the Brushes Window and create a new brush with the settings below.
7. Select the paintbrush tool, and draw some wavy lines using a darker colour using the brush you created. Experiment with the size of each wavy line.
8. Next set the colour to a white and draw some more swirly lines for the frosting and make the stroke size to 0.25.

NEXT: Let’s add a nice cherry on top . . .
Put A Cherry on Top
9. Using the Ellipse Tool, draw a circle while holding down the Shift Key and set the gradient to below. Using the Direct Selection Tool, click on the top anchor point to select it, click on it again and drag it down to create a cherry shape.

10. Select the cherry with the Selection tool and place it on the cupcake. Draw a circle over the cherry with the gradient settings below for a light effect.

11. With the Ellipse Tool draw the top of the cherry. Next using the Pen Tool draw the cherry stalk with the green gradient below.


12. Using the shape colour as the frosting, draw over the bottom part of the cherry. While holding down the Shift Key, select the frosting lines that are hidden under the frosting area, right click Arrange > Bring to Front.

13. Top finish off the Cupcake Cup, draw the shapes below using the Pen Tool & the colour Black. While holding down the Shift Key, select the shapes and set the Blending Mode to Soft Light and the Opacity to 35%.
14. For the shadow, draw a think oval shape using the Ellipse Tool, right click and Arrange to Back. With the shape selected go into Effect > Blur > Gaussian Blur.

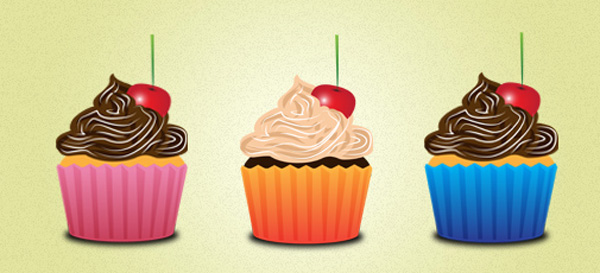
All finished! Experiment with different coloured Cupcakes and enjoy!
![]()
Special Thanks to Ainsley Bevis for sending in this tutorial. Be sure to visit Ainsley at BloomwebDesign.net
Ainsley is a passionate, and mostly self taught, Web and Graphic Designer based in Melbourne, Australia. As well as designing websites and graphic material for her clients she also enjoys playing guitar, piano, walking her dogs and cooking vegetarian food!
thanks for reading!
If you liked this tutorial and would like to see more, just send an email, or click the “SHARE” button below to TWEET it or SHARE it on your favorite networking site!
![]() Contribute your own articles in the Design Center,
Contribute your own articles in the Design Center,
![]() Join the Design Cafe forums,
Join the Design Cafe forums,
![]() Follow DTG on Facebook!
Follow DTG on Facebook!
And, thanks for reading
![]()
Don’t forget … we encourage you to share your discoveries with other readers. Just send and email, contribute your own article, join the Design Cafe forums, or follow DTG on Facebook!