Thanks to Adrian Bidea of VectorPack.net for sending in this Adobe Illustrator tutorial, with tips on editing pattern files in Adobe Illustrator. Quite often some of the problems involved with Illustrator patterns is getting them to fit the overall scene correctly. You either have to rework the pattern, or create a new one. This tutorial will make life much easier….
![]()

Thanks to Adrian Bidea of VectorPack.net for sending in this Adobe Illustrator tutorial, with tips on editing pattern files in Adobe Illustrator. Quite often some of the problems involved with Illustrator patterns is getting them to fit the overall scene correctly. You either have to rework the pattern, or create a new one. This tutorial will make life much easier….
Adrian writes :
In this tutorial I want to talk about how a pattern can be edited. And not only about how you can alter its component elements, but also about how you can change its size.
When talking about vectorial graphics, size doesn’t matter. You can make an object as big or as small as you want. There are some issues that can cause difficulties. E.g.: the size of an un-expanded brush or the size of a pattern. And here I’m talking about how often or how rarely a pattern keeps repeating itself over a specific length.

Step 1 — If you edit the pattern directly in the file that you downloaded from the VectorPack website, then this is already a 600 px width x 600 px height document.
If you want to edit it in a new document, then these are the needed dimensions. Create a 600 x 600 px square. This is the original size.

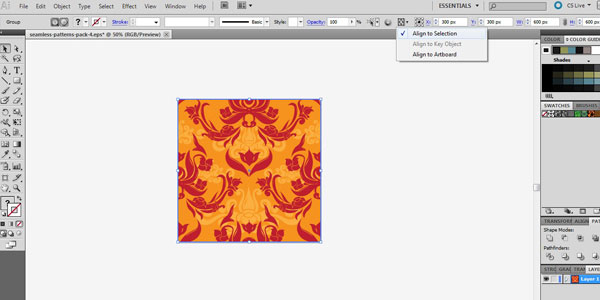
Step 2 — Fill it with the desired pattern just as if you would have colored it. We chose Pattern no. 8 from Seamless Pattern Pack 4 for this example.

Step 3 — Align the square right in the center. Help yourself by using ALIGN TO ARTBOARD.
Step 4 — Use OBJECT > EXPAND > FILL > OK.
In this step, you can also change its component elements, such as its background color or its vectorial elements. (After UNGROUP > RELEASE CLIPPING MASK > UNGROUP)

Step 5 — At this point, the graphic is not actually a pattern anymore, but a vectorial object, as we have become accustomed.
Step 6 — You can reduce it or enlarge it randomly or, if you want to use a precise size, check ALIGN TO SELECTION and set the exact values (H+W).
Step 7 — Define the new document as pattern: EDIT > DEFINE PATTERN and use an easily recognizable name for it. We’ve name it 8 BIS.

Now the new pattern repeats itself 25% more often than the original one.
And, thanks for reading
Adrian Bidea
from Romania and www.VectorPack.net
Don’t forget … we encourage you to share your discoveries with other readers. Just send and email, contribute your own article, join the Design Cafe forums, or follow DTG on Facebook!