In this free Photoshop tutorial, Paul from ForCG.com will show you how to create a vibrant and colorful abstract space artwork using Photoshop, Illustrator, and stock images. Thank you Paul! You’ll learn techniques on blending modes, the use of the pen tool in Illustrator, and how to combine elements and more
![]() In this free Photoshop tutorial, Paul from ForCG.com will show you how to create a vibrant and colorful abstract space artwork using Photoshop, Illustrator, and stock images. Thank you Paul!
In this free Photoshop tutorial, Paul from ForCG.com will show you how to create a vibrant and colorful abstract space artwork using Photoshop, Illustrator, and stock images. Thank you Paul!
Paul writes :
You’ll learn techniques on blending modes, the use of the pen tool in Illustrator, and how to combine elements for a visually stunning effect. Enjoy, and let us know what you think, as your suggestions are always welcomed.
Also, please share this tutorial with your friends, so everyone can discover these awesome free tutorials!
Tools Required: Adobe Photoshop (Gimp should also suffice.), and/or Adobe Illustrator (or similar, or pre-made brush).
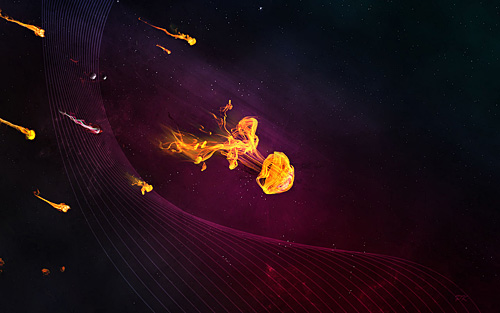
Final Image Preview — here’s what we are going to create:
Step 1: Setting up the file
First of all open up the Photoshop and create a new document with dimensions set to 1280x800px. Fill the background layer with black using Paint Bucket Tool (G).

NEXT: We’ll build a good background!
Building the Background
Grab your Brush Tool (B) and paint something like on the image below. I used #acffea for the lightest color, #407887 in the middle of the image and dark blue in the bottom-left corner. After you’ve painted it go to Filter -> Blur -> Gaussian Blur . . . and blur this layer a bit to make it look softer.

Step 3: jolly up the center part of the image
Create another layer and fill it with black. This layer will be used to jolly up the center part of the image. Decrease its ‘Fill’ to 0%. Go to layer styles and use the following settings for this layer:

Step 4: adding Luminosity
Now create a dark blue layer just above the ‘Layer 1′. You can actually use here some different shades of blue but keep it dark (just create something like in the second step of this tutorial). Set this layer to ‘Luminosity’. After that create one more layer and use the following settings for your brush to paint some stars on your newly created layer:![]() OPEN FULL SIZE
OPEN FULL SIZE

Step 5: Add some clouds
This step is optional but you can also paste here any clouds image above both layers from the previous step and decrease its opacity to around 15%. This will make your blue layer a bit more differentiated. You should get something similar to this afterwards:

NEXT: We’ll introduce vector objects from Illustrator
Introducing vector objects from Adobe Illustrator
Save your image as *.jpg file and paste it into the Illustrator. Use Pen Tool (P) to draw two lines like me (blue ones). After that go to Object -> Blend -> Blend Options . . . and use 24 for Specified Steps. Use the Blend Tool (W) and click on both paths. A few more paths between the previous ones should appear.

Step 7: Work with Smart Objects
Select them all, copy them and paste as ‘Smart Object’ into the Photoshop. Place them like one the image below. Decrease ‘Fill’ of this layer to 0% and its ‘Opacity’ to 50%. Go to layer styles and use white for Color Overlay and #0077a3 for Inner Glow.

NEXT: We generate comets from space
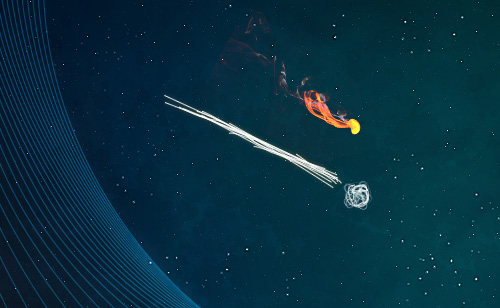
How to create comets?
Now it’s time for the hardest part which is comets. To create them we can use many different techniques but I’m going to show you my favourite one although it’s not always the best one (anyway it’s the easiest one in my opinion and gives great results at the same time). We’ll use Pen Tool (P) and Brush Tool (B) a lot but we can start with some photos at first. I used ink photographs from cgtextures.com to make it look like a fire and then I improved everything by hand using different brushes. First of all most of the ink pictures are blue on the white background. That’s great because we can invert the colors and use “Lighten” as blending mode to make it look like a fire immediately (lighten blending mode will make black invisible but everything else will be visible). In case some photos aren’t blue you can simply go to Hue/Saturation . . . (Ctrl/CMD + U) and make them so.
Step 8: building the full document
Grab any ink photo you like and paste it into you Photoshop document. Press Ctrl/CMD + T to free transofrm it. Scale it down and rotate as you like.

Step 9: Experimentation and finishing
Now make sure you have your layer selected and press Ctrl/CMD + I to invert the colors. It looks almost like a fire in my case but it is likely that your photo will need a couple more tweaks. I used Hue/Saturation . . . , Brightness/Contrast . . . and Curves to adjust my image.
Try to just play with these settings until you get something that you are happy with.

Step 10: Blend to lighten
Change layer’s blending mode to “Lighten” and erase everything that you consider not necessary.

Step 12: another optional step
Here is another optional step. I’ve created some paths using Pen Tool and used “Stroke Path . . . ” with white brush set to 1px for two comets. I played with different layer styles and blending modes to improve my comets by making them a bit differentiated. That’s optional but it may help you to achieve some diversification. Also you don’t need to paint entire comet like I did but you can create some single lines.
NEXT: Experimenting for final look and feel
Experimentation leads to great results
Keep adding more comets like the first one. Try to use different parts of different ink images to create different and detailed comets. Then use your brush and pen tool to tweak them if necessary. Once you have them all create a new layer below comets’ layers, press “D” to reset your colors to black and white and go to ‘Filter -> Render -> Clouds’. Set this layer to ‘Overlay’ and decrease its opacity to 25%.

Step 14: Saturation
Go to ‘Layer -> New Adjustment Layer -> Hue/Saturation . . . ‘ and change the Hue’s value to +138.

Step 15: Duplicate and Blur
Duplicate all of your comets and go to ‘Filter -> Blur -> Motion Blur . . . ‘ to blur it a little bit. Move blurred layer beneath the original one.

Final Touches:
You can improve your image even more by adding there some details in the background. I used some grunge brushes to pain splatters but I’ve also decreased their opacity a lot so they are almost not visible. I’ve also added some mild glow using Brush Tool (B) in some places. And the last thing is a volume light that were created using white brush and motion blur. Just try to experiment yourself and I’m sure you’ll come up with something cool!
Conclusion: That is all for now.
I hope you liked it!
Written by Brukhar from design.creativefan.com, featuring some neat and useful 3D and Photoshop tutorials that will help you improve your designing skills and put your works to the next level! Tutorial was sent in by Brukhar of creativefan.com
thanks for reading
Don’t forget … we encourage you to share your discoveries with other readers. Just send and email, contribute your own article, join the Design Cafe forums, or follow DTG on Facebook!