Ainsley Bevis shares this Photoshop tutorial to help you learn how to make a Christmas theme print-ready postcard in Photoshop!you’ll be designing the front and back of the postcard using various shapes and helpful methods — as well as opportunities for customization! Print at home, or I’ve provided the ‘work-n-turn’ method for running quantity! Have fun.
![]()

Special thanks to Ainsley Bevis from BloomWebDesign.net for sending in this great Adobe Illustrator tutorial! She covers a number of good techniques good for beginner to intermediate Illustrator users, and some of the tricks are sheer genious!
Ainsley writes . . .
Learn how to make a Christmas theme print ready postcard in Photoshop! We’ll be designing the Front & Back of the Postcard using various shapes and helpful methods & techniques.
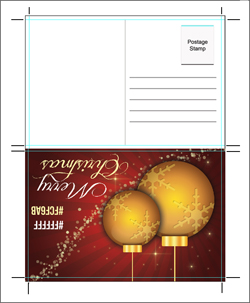
Final Result shown at the left.
1. Create a new document to be your template. Use the settings below. The resolution is set to 300 for high quality & CMYK is the Printing mode.

2. Size the cropping area: Press CTRL+R to bring up the rulers around the canvas. Drag out 2 horizontal & vertical lines and place them on the edge of the canvas like below:

3. Expand to create Bleed : Next go to Image > Canvas Size (ALT+CTRL+C) and expand the canvas using the settings below. These lines are now show the ‘Cutting Risk Area’. Make sure your postcard design stays within the lines.

NEXT: Use the Template and build your card front
Postcard Front
Before going forward, we want to save the document 2 times — one for the Front of the Postcard, the other for the back. Open up the Front Postcard document.
4. Begin with the Background : Double click on the white background to unlock it, then again to go into Blending Options. Put in the Gradient Overlay below:

5. Background Pattern : Next go into the Custom Shape Tool and select the Registration Target 2 Shape. While holding down the Shift Key (to keep the shape straight) draw a large shape using the colour black. Set the opacity to 11% on the shape.

6. Create ‘Twinkles’ with Custom Brush : Create a new layer & click on the Brush Tool. Go into Window > Brushes (F5) and put in the settings below to make a new brush type. With the colour below draw a diagonal line from top to bottom using the custom brush you created. (Open all the brush settings in a separate browser window.)

7. Set up your brushes : Go to : qbrushes.net, then download and install Star_Brushes_by_DemosthenesVoice.zip — Star Brushes. Create a new layer for the stars, using the colour #fbeea0 brush on some stars using various stars & sizes.

NEXT: Now we’ll create the Holiday ornaments for the card!
Holiday Ornaments
8. For the Christmas Ball, select the Ellipse Tool and draw a circle while holding down the Shift Key. Double click on the circle layer to go into Blending Options and put in the options : ![]() First give it an “Outter Glow“
First give it an “Outter Glow“![]() Now set up a “Gradient Overlay“ and
Now set up a “Gradient Overlay“ and ![]() Use These “Gradient Options“
Use These “Gradient Options“

9. Make it shiny with highlights : Using the Ellipse Tool again, draw an oval shape in white for the highlight.![]() Set the Blending Mode to Multiply so the oval is invisible & the Opacity to 27%
Set the Blending Mode to Multiply so the oval is invisible & the Opacity to 27%![]() Double click into Blending Options and put in the Gradient Overlay.
Double click into Blending Options and put in the Gradient Overlay.

10. For a shadow, draw another smaller oval like below using the colour white. Set the Blending Mode to Multiply. Double click into Blending Options and put in the Gradient Overlay below:

11. Ornament hanger : Using the Rounded Rectangle Tool draw the top section of the christmas ball. .![]() Double click into Blending Options and put in the Gradient Overlay settings.
Double click into Blending Options and put in the Gradient Overlay settings.

12. Draw the String : Next select the Rectangle Tool and draw the string using the colour.

NEXT: DECORATE THE ORNAMENT …
Decorating the Ornament
13. Drawing Snowflakes: Go into the Custom Shape Tool and select a Snowflake icon. Draw 2 snowflakes. Double click on each shape and put in the these Blending Options

14. Crop the icon to the ornament : While holding down the CTRL key click on the main circle’s Layer Thumbnail to highlight the shape. Go to each of the Snow Flake icon and click on the Add Mask Layer Icon. This will crop the snowflakes down to the highlighted shape.

15. While holding down the CTRL or Shift Key select all of the Christmas Ball Layers and drag them to the Folder Icon to place into a folder. Duplicate the folder by dragging it to the new layer icon. To make the duplicated Christmas ball smaller press CTRL+T on the folder and drag a corner down while holding down the Shift Key.

16. Now the message : You can use any font you like. For this demonstration, we went to the Jellyka Delicious Cake font page in www.dafont.com, and downloaded the font jellyka_delicious_cake.zip to write out the Postcard message using the colours below. The front of the postcard is now finished!

You can now stop, or continue on to part 2 where we . . .
NEXT: CREATE the BACK side of the card.
Postcard – Back
We’ve created the face of the post card, but now, in order to go directly to the printer, we’ll need to create the second side.
17. Set a Center Line : Open up the Back document you saved earlier. Drag out a 5th line from Ruler boarder to the center of the canvas (3).

18. Set a Center Line : Using the Line Tool (3px black), draw a line on the center line you just dragged out (don’t forget to hold down the shift key). This is the dividing line on the card required by the postal service. You can drag the center ruler line off the canvas using the Move Tool (V).

19. Postage Stamp or Indicia: Using the Rectangle Tool draw a shape using the colour below where the stamp will be placed. Double click on the shape to go into Blending Options and put in the Stroke.

20. Form Lines: Draw a Line using the Line Tool (2px black) for the postal address. Duplicate the line by dragging it to the new layer icon until you have 5 Lines. Move each line down by selecting the layer, holding down the Shift & click on the bottom arrow key. Note: You need to have the Move Tool clicked on while doing this.
We recommend these lines be very faint — perhaps 15% to 20% black so that they do not interfere with the address on automatic postal equipment.

We show this one filled in, but for your print version you would leave these blank, unless you intend the card to be a “pre-printed” card. Hand written is much nicer.
 22. Print Prep : If you’re ready to print each Postcard side go to File > Print. A box should appear, click on the top right menu and go into output. Select the printing marks you want to appear on the printed work. Unclick Show Bounding Box, then go into Bleed and create a 3mm bleed. Then click Print.
 ![]() Printing Dialogs
Printing Dialogs
If you want to take it to the printers for Printing, Save it in PDF format.
[FRED adds in ] Professionals will run this job as a “Work-n-flop” or “Work-n-turn” which not only saves paper, but cuts printing and handling time in half because both sides of the card are printed at the same time. They run the sheets through the press, turn them over and run them again. So you’ll need to put BOTH faces in the same art. Make the a perfect center line for the sheet, and don’t forget to allow for the bleed. If the card didn’t bleed, then the two could “share” the center cut line.
Final Result

![]()
Special Thanks to Ainsley Bevis for sending in this tutorial. Be sure to visit Ainsley at BloomwebDesign.net
Ainsley is a passionate, and mostly self taught, Web and Graphic Designer based in Melbourne, Australia. As well as designing websites and graphic material for her clients she also enjoys playing guitar, piano, walking her dogs and cooking vegetarian food! Don’t miss all her great Adobe Illustrator Tutorials!
thanks for reading!
If you liked this tutorial and would like to see more, just send an email, or click the “SHARE” button below to TWEET it or SHARE it on your favorite networking site!
![]() Contribute your own articles in the Design Center,
Contribute your own articles in the Design Center, ![]() Join the Design Cafe forums,
Join the Design Cafe forums, ![]() Follow DTG on Facebook!
Follow DTG on Facebook!