History repeats itself. A painting or photo within another has always been a popular subject with photographers, graphic artists and Photoshop artists. The “out of bounds” or “break-out” image is also one that should be tried by all Photoshop users, sooner or later.
![]() History repeats itself. A painting or photo within another has always been a popular subject with photographers, graphic artists and Photoshop artists. The “out of bounds” or “break-out” image is also one that should be tried by all Photoshop users, sooner or later.
History repeats itself. A painting or photo within another has always been a popular subject with photographers, graphic artists and Photoshop artists. The “out of bounds” or “break-out” image is also one that should be tried by all Photoshop users, sooner or later.

Special thanks to Roofi Sardar, a new Photoshop practitioner from Saudi Arabia who sent this one in. Roofi writes :
Today we’ll learn a simple yet fascinating art. The following tutorial will only make it easy for you to grasp the concept through the peace in craft. Kindly Accept.
1. Open the starter image in Photoshop. Width 600 and Height 340.
2. Go to: Image > Adjustments > HDR Toning , and make the changes indicated below:
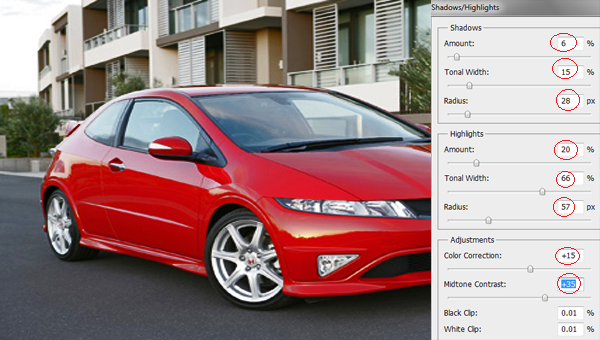
Now, our image has now become a little less dim. (See the difference)
3. Using the Quick Selection Tool, select the area outside of the car as shown:

4. Go to: Image > Adjustments > Hue/Saturation

Now deselect the selection, and it should look like this
Now for the picture frame
…
5. Open an image of a picture frame in Photoshop, and drag this onto your document.

6. Press CTRL + T and use the Distort option to adjust the orientation of the frame.

7. Now add a Layer Mask to this new Frame layer.
8. Set the foreground and background colors as black and white, respectively.
9. Select Brush Tool and modify its settings as shown:
10. Using your brush tool, cut out the unwanted part of the frame so that your image looks like that below:

11. Double click the Frame layer to open Layer Style., and make the following changes:

12. Using the Eraser Tool, wipe out the rest of the image as shown below:

13. Now we will import the backgrounds. Open another image in Photoshop, then click and drag this onto your document. Make sure that this new image is below the car image — or, in the layer behind the car image layer.
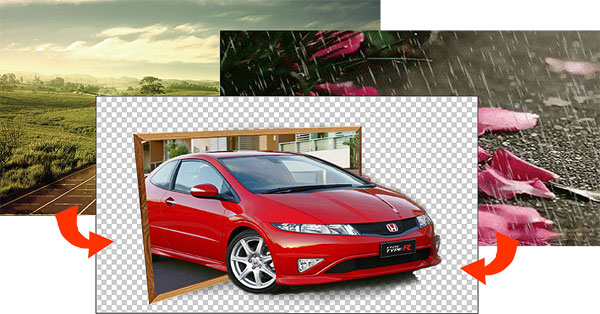
14. Open another image in Photoshop, then click and drag this image onto your document. Make sure that this new image is the topmost layer.
15. Now add a Layer Mask to this new Rain layer — then, set the foreground and background colors as black and white, respectively.

16. Select Gradient Tool and modify its settings as shown:

17. Change its Blend Mode from Normal to Overlay.
Final Picture: . . . Voila.
This tutorial sent in by Roofi Sardar, a new Photoshop practitioner in Saudi Arabia. The site, owned by Jawwad, was started in February of 2011 at “PhotoshopLayer.com”
Don’t forget to log into the Publishers’ Warehouse where you can find an incredible gallery of “out of bounds” photos created by artists from all over the world!
ALSO SEE two other angles of this technique from the past : ![]() Out Of Bounds Tutorial by Adri
Out Of Bounds Tutorial by Adri![]() Photoshop cut-out pops out of the frame by Photoshop 911
Photoshop cut-out pops out of the frame by Photoshop 911![]() VIDEO :
VIDEO :
HDR Toning in Photoshop CS5 Lynda.com![]() VIDEO :
VIDEO :
Adobe Photoshop CS5 – HDR Toning TRAINING VIDEO
thanks for reading
Don’t forget … we encourage you to share your discoveries with other readers. Just send and email, contribute your own article, join the Design Cafe forums, or follow DTG on Facebook!