In a recent Photoshop 911 forum inquiry, a reader asks how to replace the head of Jack Nicholson in a 1920s black and white photo. The poster wanted to replace it with his own head from a recent color photo… here’s the Photoshop tutorial
![]() In a recent Photoshop 911 forum inquiry, a reader asks how to replace the head of Jack Nicholson in a 1920s black and white photo. The poster wanted to replace it with his own head from a recent color photo… here’s the Photoshop tutorial
In a recent Photoshop 911 forum inquiry, a reader asks how to replace the head of Jack Nicholson in a 1920s black and white photo. The poster wanted to replace it with his own head from a recent color photo… here’s the Photoshop tutorial
This is a relatively simple exercise, and just about anyone can successfully complete this operation in little time. You can use just about any image editing software that supports layers. Between all the versions of Photoshop, CS, and Photoshop Elements, the intention of each step would be the same. So you can complete this project in any version of Photoshop running back to v3.5.
The specific areas of focus are 1) Sizing; 2) Slant; 3) Colorization; 4) Exposure. If you focus on those, one at a time, then you’ll be successful. It’s not magic, and there are no special gimmicks … just simple cut, paste, size, and adjust. Since the objects of this tutorial may be very different in your scenario, be observant to elements of each step that may need tweaking or adjusting.
1. Size and Position
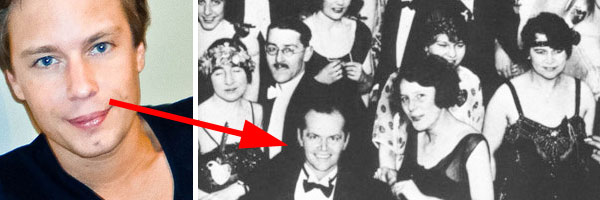
We begin with these photos, posted to the Photoshop 911 forum : The subject, and Jack Nicholson Photo. Obviously, these are very different, and will require some pre-adjustments.
Resolution: Set the resolution of the “host” image to the final output, whether printing or deploying to the web. Set the file up the way you want it to print. This is the time to set the size, dpi resolution, etc. Now go and match those settings with the “donor” photo (the subject you’ll be inserting into the “host” photo), even if it requires changes in resolution, size, etc.
Colorization: Since the photo of Jack is very old, in high contrast grayscale, we don’t really have to worry that much about precision or high-tech conversion of color to grayscale as we would in some other situations. Since our host photo is in grayscale already, we can just drag over the head of the subject without too much bother of color. It will become grayscale once it arrives in the host photo.

Using the Lasso tool, draw a tight, (but not touching) selection around the subject. Tap ‘V’ or get the selection tool, and copy/paste, or drag-n-drop the selection into the host photo. See the results and decide on the next things to be done.

You immediately see the size relationship, as well as the conversion to black and white. Next, you’ll be sizing the image, and then rotating it into the exact same attitude as Jack’s head you’ll be replacing.
Note you have selection handles around the image. You may need to zoom out a bit to see all of them, and some may be outside the image area in Photoshop’s pasteboard.

2. Alignment & Posture: Aligning the eyes is the key issue to making this look realistic. So I like to do this operation before anything else — it also gives me a better visual comparison between the before-and-after as I work.
Using the Selection Tool (tap V. if not still selected) — hover near one of the corner selection handles and begin to gently rotate the image to match the slant of Jacks. I do this visually, but here, I’ve drawn some guide lines to show the specific element I’m concentrating on.
NEXT: tweak and adjust, the fun part!

3. Colorization and Exposure are the most important considerations in matching donor to host successfully.
Make a selection of the floating ‘head’ on its own layer by command/clicking on its layer icon. (cntrl/click) Once selected, (Note the selection is active by the “racing ants” around the cut-out!)
Choose Menu : Layer > New Adjustment Layer > Levels. (This may be different, depending on your software and version.) We use an adjustment layer for non-destructive adjustments until they’re perfect.
Since the selection was active, note in your Layers Palette the new Levels adjustment layer is all black with white only where the head is. This is a Layer Mask.
 Since your image may be different, I won’t dictate exact settings. However, since this is a very high contrast image with few middle tones, we want to limit both the high and low ends of the image — accomplished by moving the left and right sliders toward the center.
Control the mid-tones with the middle slider, and at this point your eye is the most important tool to use. Adjust those sliders until you are close to the host image tonal values. We will do more adjustments later. Once sized into position, we’ll need to eliminate some of those middle tones in the final adjustments to match the original.

4. Precision Crop: Now is a good time to tighten and perfect our crop of the subject. I intentionally left it large to this point just for this purpose. It’s easier to cut him out large than small.
Return to the Lasso tool and carefully eliminate all the image area surrounding the head. Take your time.

5. Settle into Position Once the final cut-out is complete, you can now scale it to correct size, and settle it into position over Jack’s head. Notice that I made a “backup” of the head on its own layer … just in case I screw up this step. (Duplicate the Layer, or drag the “New Face” layer down onto the new layer icon at the bottom of the layers palette. A copy is created.)
Grab one of the corner selection handles, hold the SHIFT KEY (to constrain the proportions of the image) and carefully, slowly drag toward the center with the selection tool. Keep a careful eye on the size. You can ‘Undo’ (cmd/z, ctrl/z) if you want to try again. Use the chin and eyes as alignment guides, once they match you are close.
SIDEBAR: Many, many times, I’ll reduce the opacity of the image I’m scaling (Using the Opacity slider on the Layers Palette) and place it directly over the host image while scaling. Overlapping the images during scaling gives a very clear, visual indication of their size relationship. In this case it wasn’t necessary, but you should try it for future projects.

6. Readjusting Tonal Balance With the image now scaled in position, it’s easy to adjust tonal balance to match surroundings.
Choose: Layers > New Adjustment Layer > Levels and drag those sliders in a bit more. (Again, your scenario may be different — use your eye to make appropriate adjustments. Don’t worry, you can come back again and again to readjust until it’s perfect.)

Choose: Layers > New Adjustment Layer > Brightness/Contrast and bring on the contrast. In the original host image note all the blacks are just about the same black, and the whites are all pure white with very little high or low middle tones. This slider helps match that.
Blurring Until now I haven’t mentioned blurring. In order to look natural in its new environment, the new face needs to be blurred slightly. You can plainly see that I did not do it. The amount of “realism” you wish to retain in the new addition is up to you. Now is the time to blur while the selection is still active. Use Filter > Blur > Blur, and that should be enough. If it’s too much, then Undo.
 7. Final Cut & Crop: Now is the time to fine-tune your cut-out cropping and attitude adjustments. IN the above step we clearly see that the subject’s neck covers much of Jack’s tux shirt and bowtie. We also see the mistakes we made in the cropping of our subject’s hair. In the original, the blacks flow into other blacks and we see very few “hair” outlines. Fix that, and mortise our subject directly into Jack’s shirt.
(Above) Turn off layer visibility of layers above Jack’s photo, so you can see it. (Click the ‘eye’ icon) Now, use the Lasso tool to make a precision selection of his collar, tie, shirt and portion of his shoulders.

TURN ON the layer with the new face, (Click the ‘eye’ icon) and while the selection is still active, click on the new face’s layer to make it the active layer and DELETE. This removes the unwanted parts that were covering Jack’s tux.
Now take your Lasso and get rid of the white fringe around the top of his head so his hair blends directly into the black surroundings.
As Senior forum member “iDad” pointed out, now you need to analyze and adjust the blacks where they meet in his hair. Click the LEVELS button in the adjustment layer and in the resulting Levels dialog you can tweak those blacks until they match. (Thank you iDad!)

By this point I think you’re done.
Zoom out and evaluate your work. It’s just about right.
SAVE the file, give it a name, and then SAVE AS… again, giving it a different name. In the new file, begin dropping the layers, from the top down, so you end up with two layers, the original and the new head. Now toggle the new head off and on to see how they compare.
If it doesn’t look right, close the file and open the un-flattened version and tweak any of the layers. Once it’s finally the way you want it, SAVE the layered file, then flatten, then select its output format — Tiff, JPG, PDF, etc., and SAVE AS… with the final name.
Bravo, you’re successful.
![]() Final Image
Final Image![]() Jack, I hope you enjoyed the event!
Jack, I hope you enjoyed the event!
![]() Original Photoshop 911 Forum Post
Original Photoshop 911 Forum Post
And . . . thanks for reading
![]()
Don’t forget … we encourage you to share your discoveries with other readers. Just send and email, contribute your own article, join the Design Cafe forums, or follow DTG on Facebook!