Just in time for the bewitching month, learn how to create a very cool wizards hat icon using Adobe Illustrator! Another great tutorial sent in by IconShock

![]()
Welcome back to the virtual space where some of the secrets for creating iconic beauties are unveiled.
The word ‘wizard’ has its root on concepts like wisdom and guidance. Most probably that’s the reason why those helping user interface elements, the assistants, are also called wizards and are represented by default with a wizard’s hat and wand icon.
The spell will be performed using Illustrator CS4.
Step 01.
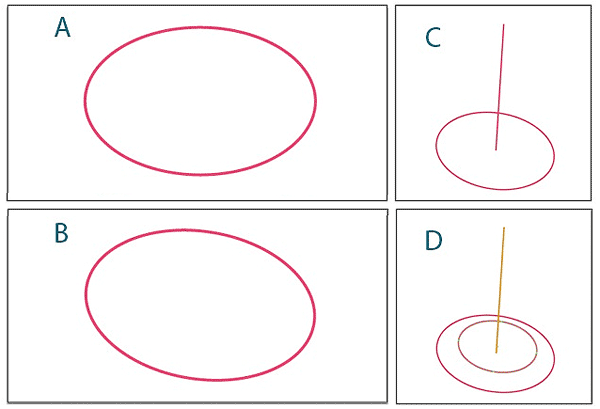
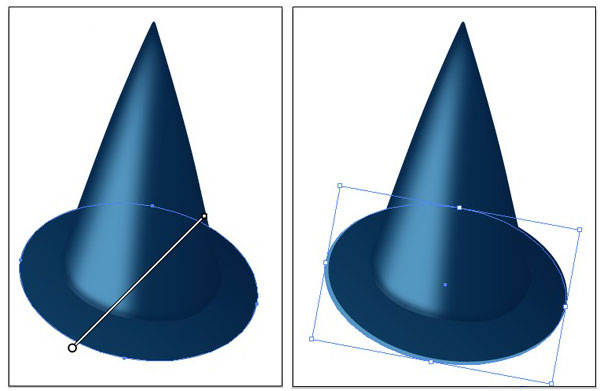
Start with a new 256 x256 px document. The brim of the hat will be an ellipse (A) with a small rotation (B). Duplicate that ellipse, reduce its size and place as the inner part of the hat. To help visualize the perspective you can use a line segment as an axis or reference.
Note: When talking about ‘duplicating’ an object, we will refer to the procedure of copying (Crtl+C) and pasting in front (Shift+Crtl+V).
Step 02.
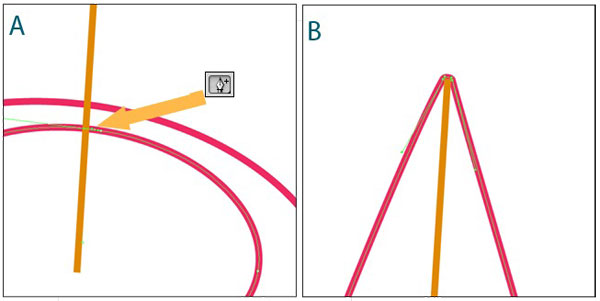
Now duplicate the smallest ellipse. This will be used to make the cone of the hat. The idea is to move upwards the top anchor point, however, in order to make a round corner, first create a new anchor point near to that one using the Add Anchor Point Tool. Move those two points to the end of our guide axis and adjust the outer handles of both points until you get a cone like in figure B.
Step 03.
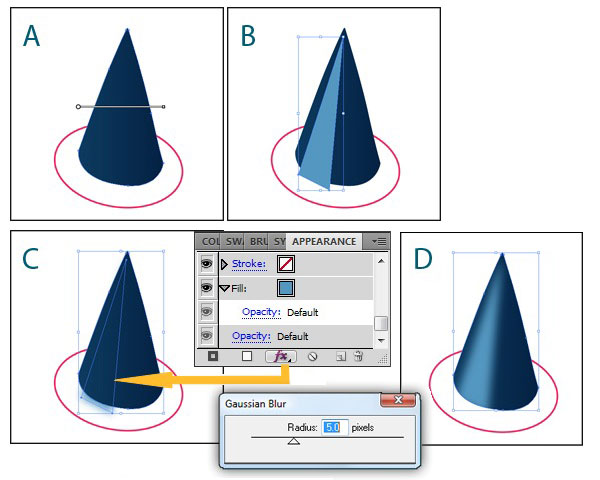
A) Apply a basic gradient fill to the cone. RGB values here are: (13, 59, 96) and (4, 33, 66).
B) Draw a triangle with the Pen Tool, this will be the shine. Fill with color (84, 151, 192). Keep this triangle selected, bring on the Appearance Panel (Shift+F6) and press there the Add New Effect Button. From the drop down menu, go to Blur – Gaussian Blur and use 5.0 pixels for radius.
C) The shine is almost ready but it flows over the brim area. Let’s mask it. Duplicate the base cone and place it on top of the triangle so that you do not see the light blue triangle. Select both cone copy and triangle and press Crtl+7 (Make Clipping Mask).
D) The base cone will disappear but its shape is now a kind of window through which you can see the shine, with no overflowing. We will use this technique several times along this tutorial.
Step 04.
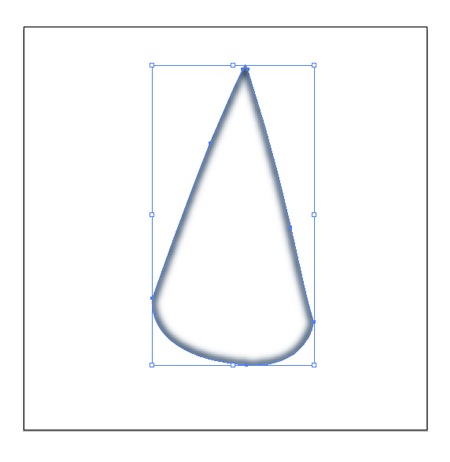
Now make a new duplicate of the cone, remove the fill and use a 2 pts stroke with color (4, 33, 66). Apply a 2.0 radius Gaussian Blur. Finally use another cone as a clipping mask for this inner shadow. (click image for enlargement)
Step 05.
Let’s now work on the brim. Remove the initial stroke and apply a gradient like that used in step 03, part A. Then duplicate that oval, send it to back and apply a solid fill with the light blue of step 03, part B. move it a bit down-left.
NEXT PAGE: Add power by drawing some stars of 5 points.
Step 06. Add power by drawing some stars of 5 points.

Illustrator can make perfect pentagrams. Select the star tool. When drawing your star note that if you press up and down arrows changes the number of points. Dragging with Shift pressed will make a perfect 5 points star. Alt and Crtl also provide other functionalities. This ceremonial hat will use 7 stars generated with Shift pressed. Use a yellow gradient with these colors: (190, 114, 2) — (255, 214, 49). Do not forget to group each set of different components.
Step 07 : Create the Wand 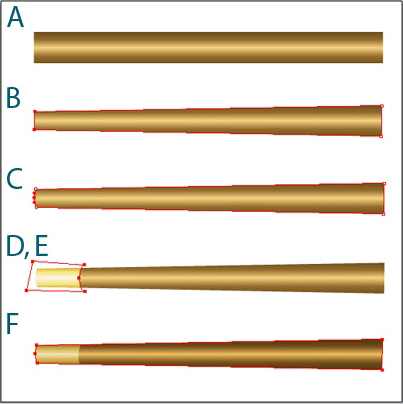
The magic wand symbolizes power and authority.
A) Simply draw a rectangle and use a gradient with (113, 81, 31) — (244, 211, 131).
B) With the Direct Selection Tool reduce the size of one of the sides.
C) Add one anchor point and move it outwards a bit just to give the impression of roundness.
D) With the pen tool draw a shape which will be the different tone zone of the wand. Set its transparency to Overlay 50%.
E) Now duplicate the main body of the wand. Select the shape and the rectangle and hit Crtl+7 (clipping mask) like in step 03 C. A zone of the magic wand will change its color.
F) Finally duplicate the wand again and set the transparency to Multiply 50%.
Step 08: Finish the wand
Finish the other side with an oval filled with a gradient similar to those dark tones of the wand. (left below)

Step 09 : Add a shadow from the Wand
(right above) For a better effect, put a shadow that the wand projects onto the hat. Make one last copy of the main shape of the wand, fill it with black, apply Gaussian Blur (2.0 pixels), move it a bit downwards and make a clipping mask with a copy of the cone (step 03 – C).
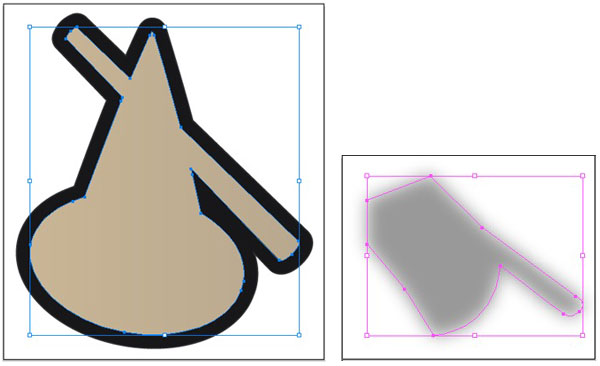
Step 10 : Heavy outer stroke
Make a copy of the whole object and delete the clipping mask in order to keep the exact shape of the hat and the wand. Use the command Unite from the Pathfinder panel (Shift+Ctrl+F9) and give a black 9 point stroke, as shown in the picture.
Note the settings used: align stroke to outside, round cap and round join. Send it to back. (below, left)
Step 11 : complete with shadow
(Above, right) The shadow of the complete object can be done like in the previous step.
Simply do a copy of everything, with no transparency masks, and unite like in step 10. Delete unnecessary parts, Fill it with black, apply Gaussian Blur 5.0 pixels and Normal transparency 40%.
Although this is a very geometric icon, this time our results are more realistic than ever. Very appealing, don’t you think? Try varying colors, or add another symbols instead of some of the stars. You could make an even more interesting version of this icon.
Click on image at right for the finished icon.
The universe is full of magical things,
patiently waiting for our wits to grow sharper.
Eden Phillpotts
Special Thanks to the Icon Library for contributing this Adobe Illustrator tutorial. We hope you enjoyed learning how to make a great wizard Icon to use in your applications or in your magic tricks. For icons, free icons, and to use icons, see the ICONSHOCK web site!
If you want to suggest a cool tutorial you’d like to see here, or if you have a tutorial to share with DTG and Photoshop 911 readers, just let us know
, or post it here!