Debi entered a Photoshop 911 Emergency case, with photographs where the deep shadows were too dark. So, in this Photoshop tutorial, we demonstrate the use of a Levels Adjustment Layer that acts like a mask allowing Debi to paint in the areas of the image to be adjusted!
Debi wrote Photoshop 911 with this problem of under exposure in her photographs:
 > Hi, I have a picture of my wedding reception.
 > Becuase of the lighting around the room, the
 > background of all the pictures look dark.
 > Can you tell me how to lighten it, without changing us?
 > I am a little confused on the layers.
 > What I have so far is the main layer that I did not
 > do any changes to.
 > Then a duplicate layer where I did some adjustments
 > to our skin (named skin).
 > Please tell me where I go from here to follow your steps.
 > Thanks so much
![]() Concept: While the following does not use wedding pictures, the basic premise is the same. Areas of the photo are overly dark due to under exposure. You’ll need to mask the ‘good’ portion of the image, and raise the levels in the dark portions.
Concept: While the following does not use wedding pictures, the basic premise is the same. Areas of the photo are overly dark due to under exposure. You’ll need to mask the ‘good’ portion of the image, and raise the levels in the dark portions.
Use an adjustment layer filled with black to mask the “good” parts of the image, while painting in white to reveal the dark, shadow areas of the image for adjustment.
Adjustment Layers for Shadow Balancing
Although there are a dozen ways to lighten or darken small portions of an image, the use of adjustment layers and masks has made the technique easy and non-destructive.

Our group was about to embark on a raft trip down the Nile in Uganda, Africa, when we encountered this young African “Jack Fruit” girl hoping to sell to our group. She was moving in and around the group quickly, so I had to get the shot as best as possible.
The surrounding foliage and water is just about the correct exposure, however the platter of jack fruit is seriously shadowing the little girl’s stern expression. We’ll need to lighten her just a bit, without disturbing the rest of the image. You can do this easily using a Levels Adjustment Layer.
Note, these screens where greatly optimized for web display, so some raster debris is evident. These were not in the actual image.
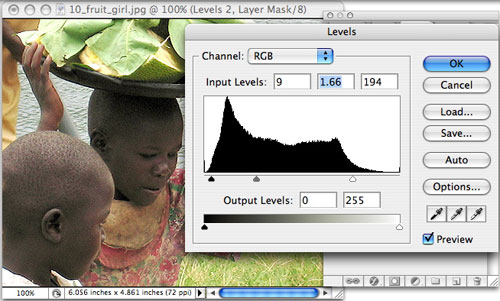
![]() Adjust for target settings: Initiate a new Adjustment Layer for Levels.
Adjust for target settings: Initiate a new Adjustment Layer for Levels.
(Layers > New Adjustment Layer > Levels)
Move the right slider toward center, and the center slider toward the left. The beauty of the Adjustment Layer is it can be infinitely tuned until just the right look is achieved.
Notice however that during the process, we’ve made the scene too light — — taking away the richness of foliage along the banks of the Nile. That will be easy to fix by modifying the adjustment layer’s mask.
![]()
Modify the Layer Mask: As with most adjustment layers, a mask is applied to the right of the layer thumbnail. Here’s where all the action will take place
![]()
Click on the Mask![]()
Fill it with black

![]()
Paint White to Reveal: Now, use an appropriate brush size and opacity and begin painting white into the mask to reveal just those areas that need lightening.
We have pre-tuned the Levels in this adjustment layer to provide the desired lightness of the girl. The BLACK completely hides those adjustments. As we paint white into the mask, those adjustments once again come into play.
Notice, I’m painting along the platter, down the arm, and within the face. (See the white shapes in the black layer mask at the far right above.) I’ll also just lightly touch areas of the little boy’s features to lighten them as well.
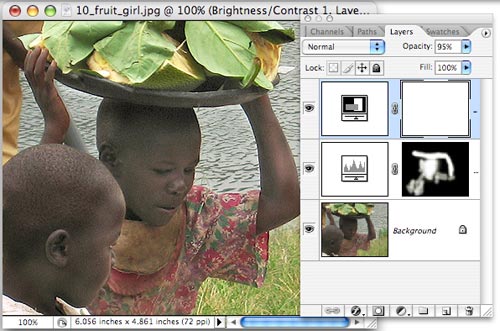
Before finishing, I want to add a slight bit of “richness” to the overall scene with a Contrast/Brightness Adjustment Layer. Now the image is ready for flatening and further use.
You might also find this Photoshop Tutorial on Exposure Balancing of some help in future layers work.
The pros might take a somewhat different approach, using curves or further modifications. You should experiment with the above techniques to see if that’s the cure — or if you want to investigate other options.
 For that, you need to buy
 ![]()
The Creative Digital Darkroom by Katrin Eismann. She is the world’s leading expert, and will easily show you how to get spectacular results on such a retouching job.
This is an inexpensive manual that covers all of these kinds of steps in Photoshop, and will give you everything you need to know to put layers and adjustment layers to work for your photos. I recommend it highly!