The previous Photoshop tutorial focused on using Photoshop's Cropping Tool to scale an image while maintaining aspect ratio. Now, let's
Photoshop Tutorial: Cropping Photos To Specific Frame Sizes
So you'll get home from vacation and then want to print photos to a specific size. It will need cropping, and re-sizing. Now, if you really want the easy way, then go to your local Kinko's, CVS, Wallgreens, or Rite Aid, and use the Kodak photo kiosk. I've started doing that for all my "keepable" photos simply because a) the machine does it much faster, b) costs a lot less, and c) will last a lot longer as an archivable photo.
But let's say you want to craft your own prints. Well that's okay too, and hopefully this tutorial will help you on your way to better photos.
A very frequent querry from Photoshop Madness and Photoshop 911 readers concerns resizing photos, and getting them to fit a standard frame size like 5x7", 8x10" or 11x14". Like many cameras, the image taken doesn't necessarily fit any size. It's up to you to do the brain work.
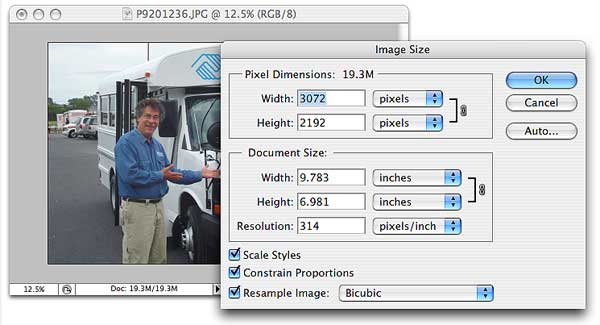
Here's a shot of the new bus we just bought for our local Boys and Girls club. We would like to print this photo as an 8x10" so it can be framed for the director of the club. Since the photo was taken with an 8MP camera, getting a professional quality 8x10" print from it will be fairly easy.

The pixel dimensions of this image are found in Photoshop's Image Size dialog box under the Image menu. At the top of the dialog box, you will see the "Pixel Dimensions" section indicating that this photo, right out of the camera, is 3072 x 2192. This number really has nothing to do with the size the image will print -- but rather its raw pixel count.
Below that, you will see the Document Size section of the dialog box, which tells us that at a resolution of 314 pixels per inch the photo should print exactly 9.783 by 6.981 inches. Believe me, that's not a standard size. To achieve an 8 x 10 (or 10 x 8 in this case) we'll need to do some resizing. We also want to do a bit of cropping.
![]() NOTE: as a rule of thumb, when talking about any visual images books, photos, displays, signs, etc., always state the WIDTH first. While most people might say 8 x 10, this is a 10 by 8. If you do that, you'll avoid confusion as to which dimension is the width because professionals always state the width FIRST.
NOTE: as a rule of thumb, when talking about any visual images books, photos, displays, signs, etc., always state the WIDTH first. While most people might say 8 x 10, this is a 10 by 8. If you do that, you'll avoid confusion as to which dimension is the width because professionals always state the width FIRST.
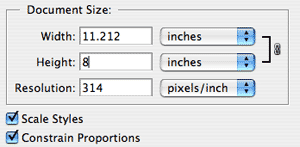
 Many people might be inclined to merely set the height of the photo to 8 and run with it. However, if you do not want to change the aspect ratio, you leave Constrain Proportions option checked. What happens? As you can see the photo is still not sized correctly. Changing either number doesn't work.
How do I resize the photo to 10 x 8"? Well, not in the resize dialog. Let's use the Photoshop Crop Tool for this task.
Select the Crop Tool or tap 'C' on your keyboard. Take a look at the options bar, and you'll see text entry fields for Width and Height where you enter your desired dimensions. So, type in a "10" for the width. (It accepts either pixels or inches, so type a "in" to tell Photoshop you want "inches") and "8" for the height.

Now, click inside your image and drag out a cropping selection. Try dragging up, down or sideways. Notice that the shape of your border is now fixed. You cannot distort it because it's holding to the 10 x 8 aspect ratio. Sweet.
Remember to drag slowly, and WHILE you are dragging you can press the keyboard Space Bar to move the selection rectangle around the screen. You can also reposition the cropping area after you've stopped dragging by clicking and dragging the border around with your mouse. The area inside the border is the part of the photo you'll be keeping, and everything outside the border (which appears white) will be cropped away.

(Once you have an active crop selection, you can change the color of the 'scrap' -- the area to be cropped away -- by using the Color and Opacity settings that now appear in the Options Bar.)
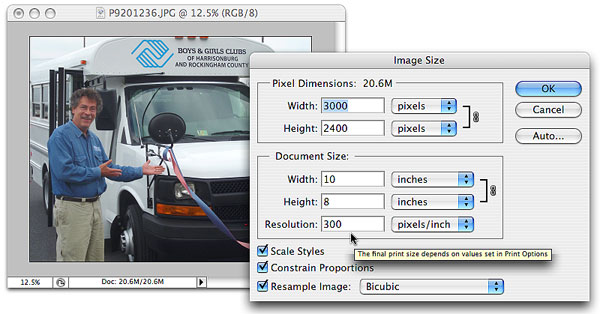
Once arriving at the size and position of your desired cropping border, simply press Enter (Win) / Return (Mac) and Photoshop will dutifully crop the image to your exact specifications -- as evidenced by the new Image Size dialog.

Note that we could have just as easily ask for 7 x 5 or 14 x 11. The results would behave the same. I should note here as well, that if you're looking to go larger than the 'natural' dimensions of the image, you should set your resolution lower. I could have set it to a minimum of 250 ppi, which is considered optimal for printing. However, I always attempt to achieve 300 ppi for a better finished product.
So, next time you're looking to resize, scale, and crop an image into a specific size, don't use the Size dialog, use the Cropping Tool. You'll be happier that way.
Happy Shooting ... and thanks for reading...
Previously: You can also ue the cropping tool to crop and scale an image while maintaining aspect ratio!
Or, return to the Photoshop Department, or the Design Center Index
Participate in your Design Center
Lots of fun and information for all... don't forget, any community is only as good as the participation of its members. We invite your tips, tricks, comments, suggestions and camaraderie.- Ask for the DT&G Monthly: to receive DT&G newsletter each month, happenings in the Design Center and regular columns like the "Mail Bag" and "Cool Sites"
- Photoshop 911 Forums : where you'll find lots more help with Photoshop
- Discuss this : in the Designers' CAFE Discussion Forums
- SUBMIT: a news link, new font, or product review
- SUBMIT: a link to a Photoshop web site

