Photoshop Tutorial: Patterned Monochromatic backgrounds
A reader in the Photoshop 911 Forums posted this image asking how the effect was accomplished. It's a hockey scene with a player lifted from the background, highlighted with a white feathered rim-lighting effect. The background itself was covered with a blue and black pattern giving it a sort of vague looking venetian blinds sort of effect. This is fairly easy to do in all versions of Photoshop and Photoshop Elements. I'll show you the extended layers version, not using anything fancy so that it goes way back to version 4.
Isolating the subject
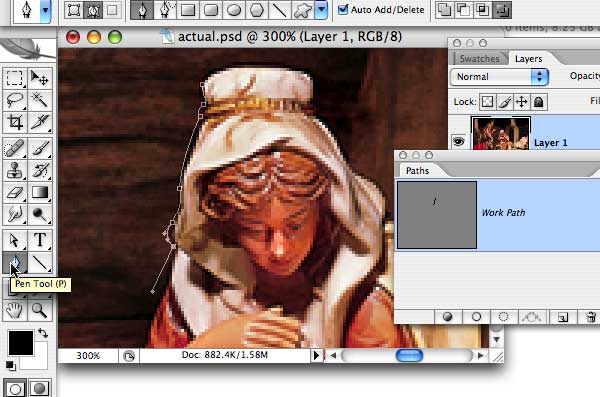
I don't have a hocky picture, but since the holidays are just around the corner, I'll use this nativity scene for my subject. First you'll want to isolate your subject. It doesn't matter if it's from the same image, or a different image, the steps are the same, you'll have to cut it out. Using the Lasso tool or the Pen tool, which ever your program has, get started.

Here, I'm using the Pen tool. For this kind of work, it's much better because it is infinitely adjustable. You can go back and use the hollow pointer tool to modify, and adjust all the curves until they are perfect. In this window, you see the outline appearing in the Paths palette.
 The "work path" will remain a work path until you rename it or close the file. If you rename it, it becomes a part of the file and can be re-modified by selecting it in the Paths palette and utilizing the pointer tools to modify anchors, paths or path handles. (The "hollow" pointer tool is the "direct selection" tool which acts upon the elements in the path. Access it by tapping the letter "A" in Photoshop. The Solid tool is the "Path Selection" tool and selects only the entire path and all its components.)
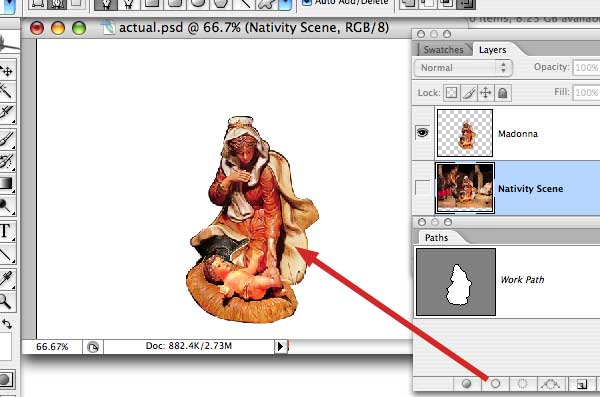
When you have your path perfect, just click the dotted circle at the bottom of the Paths Palette and the path becomes a selection. Return to your photo layer with selection active (Racing ants) and use cmd/J, ctrl/j to lift a copy of the image to a new layer. Diagram Set that layer aside until you're ready for it. (I usually move it to the top of the layers stack where it's safe.)
Preparing the Base Image
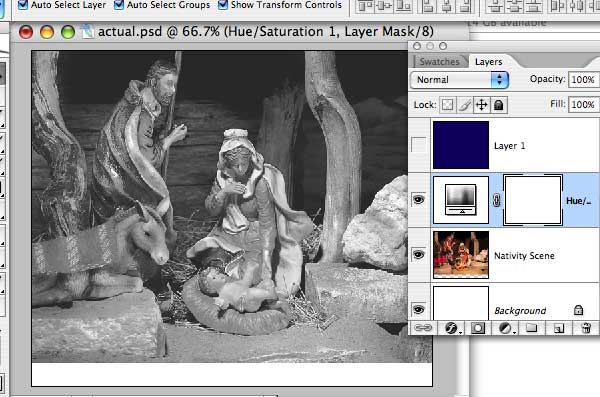
Since we're doing this in layers using Photoshop, I'm going to utilize adjustment layers here because they are non-distructive and infinitely editable. To make a monochromatic version of the background for this effect, we'll need to desaturate the image, and brighten the whites so they cut through the color pattern layer we'll be creating next.

Select Layers > New Adjustment Layer > Hue/Saturation, and drag the middle slider all the way to the left. This removes all color. Now, move the "Brightness" slider to the right to brighten the white areas. (If your software doesn't have Adjustment Layers, then just take the image into a new file, convert the mode to "Grayscale" and then drag it back into this file.)
Continue on the next page to Generating the Pattern
Or, return to the Photoshop Department, or the Design Center Index
Participate in your Design Center
Lots of fun and information for all... don't forget, any community is only as good as the participation of its members. We invite your tips, tricks, comments, suggestions and camaraderie.- Ask for the DT&G Monthly: to receive DT&G newsletter each month, happenings in the Design Center and regular columns like the "Mail Bag" and "Cool Sites"
- Photoshop 911 Forums : where you'll find lots more help with Photoshop
- Discuss this : in the Designers' CAFE Discussion Forums
- SUBMIT: a news link, new font, or product review
- SUBMIT: a link to a Photoshop web site


