

Photoshop Elements & Watermarking
Photoshop 911 answers readers' questions
One of the frequent questions we receive deals with automating various functions in Photoshop or Photoshop Elements. We've had many articles about automation and actions in the Photoshop Tips & Tricks department but haven't really explored Photoshop Elements.
While the Process Multiple Files feature in Element is not nearly as robust as its counterpart in Photoshop, it does provide a number of valuable functions in Elements. To get started...
Choose: File > Process Multiple Files

The resulting Process Multiple Files dialog offers a selection of choices, including watermarking.
1. Select the Source of the files:
Here you navigate to the folder where the files are located to act upon.
Destination: Be sure to specify where you'll save the files after automation. This is important if you don't want to over-write the existing files. You should set up the new directory before beginning this process so it's ready to go.
Notice, here you can also chose to rename the files if you wish.
2. Watermark: In the lower right corner you'll find the Watermark function. This will insert your copyright watermark into each of the processed files. You can enter as much text as you wish into this window -- even though it looks rather small. We suggest you write the text beforehand, in a text editor, so it's exactly the way you want. You could also enter notes or captions.
3. Position: this pull-down allows you to place the watermark in your desired position. Most people will select centered, simply to make sure it runs across live image area, preventing the images' use elsewhere.
4. Attributes: you can also set type font, type size, color and transparency of the watermark. Here, you'll probably want to do some advanced experimentation to see how you want to configure your type.
5. Getting Help: As with most Adobe products, you'll usually find a link to some help files in case you wish to explore more features or learn more about that particular dialog. You should read those help files from time to time -- perhaps it would sometimes eliminate the need to write Photoshop 911 to answer your questions!
Semi-Automated Watermarks
Many of you will find the above method a little crass in the final results. In that case -- if you want more control over the watermark, yet want a degree of automation, you can do it using the custom brush feature.
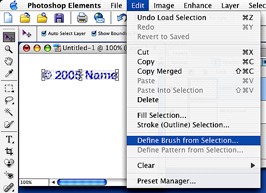
Set up your watermark the way you want it, including type or even logos, and then
Choose: Edit > Define Custom Brush
This will convert your watermark into a custom brush to be used in any file. You'll have the ability to set color and transparency appropriate to the specific file.
Warning: if you like this method, always be aware of resolution. Be sure to set up your brush image so it looks correct in the file resolution you'll be using. Many pros have multiple custom brushes such as this set up for the various resolutions they frequently deal with.
Be sure to give your brush an appropriate name -- particularly if you have multiple brushes for different resolutions. You can name the brush in the Define Custom Brush dialog.
With a custom brush watermark, just open a group of files, click with the brush, and save. Change color or transparency on the fly. You can mark a number of files quickly -- yet retain some degree of control as you progress through the files.
That's all there is to it!
If you'd like to know how to do something in Photoshop or Photoshop Elements, just ask. And, don't forget to visit the Adobe Photoshop Elements User Group web site and Photoshop Elements discussion forums.
Return to: the Photoshop Department, or the Design Center Main Index
Participate in your Design Center
Lots of fun and information for all... don't forget, any community is only as good as the participation of its members. We invite your tips, tricks, comments, suggestions and camaraderie.- Ask for the DT&G Monthly: to receive DT&G newsletter each month, happenings in the Design Center and regular columns like the "Mail Bag" and "Cool Sites"
- SUBSCRIBE : to the Designers' CAFE email list
- Link to this site, and then show us the link. We'll send you any of our current door prizes, just for your trouble.
- Help Support The Design Center: with your donation, we say thank you with free books, listings, and even links on the front page!
- SUBMIT: a news link, new font, or product review
- SUBMIT: a link to a Photoshop web site