

![]() PrintLizard.com has printed thousands and thousands of jobs for designers from every facet of the business world. Being primarily an online business, you can easily imagine how many nightmare printing jobs they encountered and how disasters they've avoided for their clients. They've now pooled the FAQ in to this BEST RULES FOR PRINTING YOUR PIECE PERFECTLY -- covering a number of problem areas and their solutions that will insure your project is perfect from start to the finish!
PrintLizard.com has printed thousands and thousands of jobs for designers from every facet of the business world. Being primarily an online business, you can easily imagine how many nightmare printing jobs they encountered and how disasters they've avoided for their clients. They've now pooled the FAQ in to this BEST RULES FOR PRINTING YOUR PIECE PERFECTLY -- covering a number of problem areas and their solutions that will insure your project is perfect from start to the finish!
Best Rules for Printing your piece perfectly
from the Print Lizard
Whether you are a veteran graphic designer, a newcomer to the printing business or somewhere in between, one thing's for sure: you want your printed piece to be perfect -- no excuses. With today's tighter deadlines and clients expecting more out of you in less time and for less money, it's easy to make mistakes. Most of these mistakes create headaches for you and your printer in the prepress stage, which can cost you both money and precious time.
However, almost all headaches can be prevented if you just don't allow yourself to panic when in the rush to make a deadline. So, take a deep breath, exhale slowly, use a bit of common sense and, when necessary, make a simple phone call to your printer for help.
Consult With Your Printer: The first step before you even begin your designing is to contact your printer. Any good printer will have a prepared set of guidelines for you to follow that will be compatible with our plating set up. The printer's Customer Service team is well versed to help you with any issues, questions or concerns you might have. They can also assist you with specifications on bleed, color set up, file resolutions, etc. It's always easier, faster and cheaper to build your file right the first time instead of needing to re-engineer it later.
Layout: One of the most common problems facing printers is with incoming files. The files are usually not set up properly for final print. Almost all printers will have templates or dielines available to help you build your artwork to. At PrintLizard we always give our customers information on the final trim size, optimum print areas and bleed requirements even before they start designing. It's also important to confirm the final dimensions before you start designing so when you get a template you'll know it wasn't reduced or enlarged.
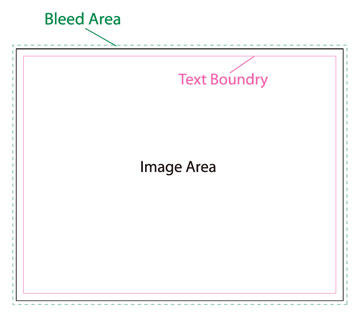 Bleeds: Always design your artwork with bleeds. At PrintLizard, we make our templates with a color code to show where the bleeds are and where the safe text/image area is on the product. For most projects 1/8th of an inch is sufficient. Keep in mind that if you do not include bleeds on your file, your printer will likely add them manually later. But they will charge you by the hour to correct your files or worse, reject your files and return them for you do to anyway! Neither option is acceptable and both can jeopardize your deadline and budget. So add bleeds from the beginning or checkout the printing templates for many of your business printed products at www.printlizard.com.
Photo Resolution: Different print processes require different photo resolutions. A good rule of thumb is to double your line screen. For example, if you know you printer uses a 150-line screen, you should scan your photographs or artwork at 300DPI. If you more than double your final line screen, you will most likely do nothing more than increase the size of your file. And this will just cost you time and use up additional disk space. Saving your images at a lower resolution will only give you a lower quality final product.
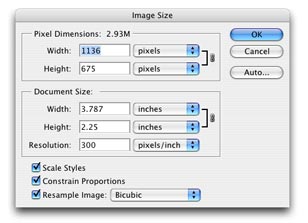 And don't make the mistake of trying to make a low-resolution image better by just increasing the resolution from 72 DPi to 300DPI when you save it - it simply does not work. When in doubt - call your printer beforehand. At PrintLizard.com we have graphic artists that work on every single job and our Customer Service Reps are very knowledgeable on any graphic issues or questions you might have.
JPEGS: This file format can be your best friend or your worst enemy. Though a JPEG file is generally smaller than other file formats, most people don't realize that every time you save an image as a JPEG, it loses data and deteriorates your image quality. The more you save it, the more quality you lose. A simple way to resolve this is to save your image as an EPS or TIFF file until your final save. When you're ready to do a final save, do a "Save As" and choose JPEG. This way you still have the highest quality image possible in case you need to make revisions later.
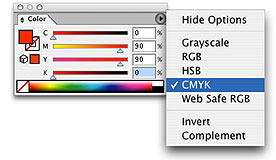 RGB vs. CMYK: Like PrintLizard.com and most full color printers, 4 color process inks (CMYK) are used instead of RGB. As a Graphic Designer, you may think that RGB gives you a wider color spectrum to work with. But did you know that much of that wider spectrum data could be lost when it is converted to CMYK? So convert your RGB files to CMYK before you finish. Not only will you see a truer representation of your image before you submit your art - you'll also make your printer happy.
Color settings: Before you begin designing your artwork for print, double check to be sure your Document Color Mode is set to CMYK. If it is set to RGB your colors will be converted to CMYK later with undesired results. (See RGB vs. CMYK above)
CONTINUES ON THE NEXT PAGE...
Return to the Business Department, or back to the Front Page
Participate in your Design Center
Lots of fun and information for all... don't forget, any community is only as good as the participation of its members. We invite your tips, tricks, comments, suggestions and camaraderie.- Ask for the DT&G Monthly: to receive news about DT& headlines, happenings in the Design Center and regular columns like the "Mail Bag" and "Cool Sites"
- SUBSCRIBE : to the Designers' CAFE email list