It’s getting cold, cold, cold, but our friend Ainsley Bevis from BloomWebDesign.net is hot with this great Adobe Illustrator / Photoshop tutorial! You’ll enjoy some tricks for 3D, and then the whole piece drops into Photoshop for finishing!

![]() It’s getting cold, cold, cold, but our friend Ainsley Bevis from BloomWebDesign.net is hot with this great Adobe Illustrator / Photoshop tutorial! You’ll enjoy some tricks for 3D, and then the whole piece drops into Photoshop for finishing!
It’s getting cold, cold, cold, but our friend Ainsley Bevis from BloomWebDesign.net is hot with this great Adobe Illustrator / Photoshop tutorial! You’ll enjoy some tricks for 3D, and then the whole piece drops into Photoshop for finishing!
Ainsley writes . . .
Learn how to create the Text Effect from the movie, Happy Feet! We’ll be using Adobe Illustrator, 3D effects and Gradients to create this cute text.

Illustrator
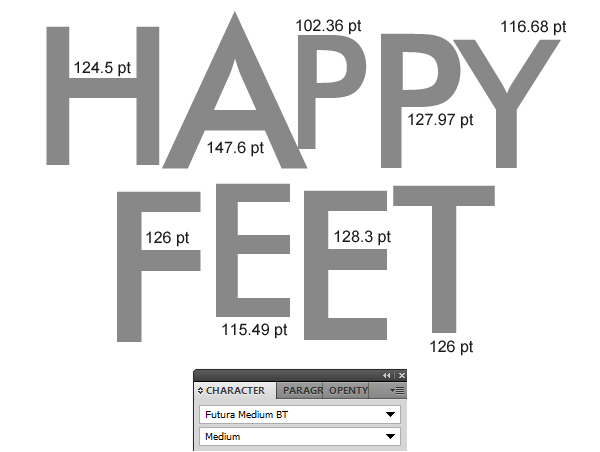
1. Set up : First download and install this font: Futura Medium from Fontzone.
Open Illustrator and write each letter separately using the size for each below with the fill colour to a grey with a stroke of none. Arrange the letters like the Happy Feet Text.
2. Creating the 3D Letters : Next select each letter and go into Effect > 3D > Extrude & Bevel. Put in the settings below for each letter.

- Effect > 3D > Extrude & Bevel the letter “A”
- Effect > 3D > Extrude & Bevel the letter “P” (first time)
- Effect > 3D > Extrude & Bevel the letter “P” (second time)
- Effect > 3D > Extrude & Bevel the letter “Y”
- Effect > 3D > Extrude & Bevel the letter “F”
- Effect > 3D > Extrude & Bevel the letter “E”
- Effect > 3D > Extrude & Bevel the letter “E” (second time)
- Effect > 3D > Extrude & Bevel the letter “T”
- Or, you could open the whole stack in a single file
NEXT : Adjustments to 3D files, and Final Assembly
Adjustments to 3D files, and Final Assembly
3. Make the adjustments to positioning : If some fonts are overlapping, right click the font and go to Arrange > Send to Back. Or if you want to bring a letter forward, right click > Arrange > Bring to Front. Using the Selection Tool select all of the letters and go into Object Expand Appearance. With the letters still selected go into Object > Ungroup (Shift+CTRL+G), you’ll need to do this about 10 times. This will make it so you can select each section of the letters.

4. Styling Letter Fronts : While holding down the Shift Key select the front part of the letters on the first word. If you click on the wrong section just click on the section again while still holding down the Shift key. With all the main shapes selected put in the Gradient below.

5. Do the same with the second word, but put in the gradient below.

6. Now select all of the 3D sections of the letters and put in the Gradient below. You may need to Enlarge the canvas using the Zoom Tool to select the smaller 3D sections that are hard to select and apply the gradient.
Quick Tip: To apply a gradient that’s already on the canvas, while the shape you want to put the gradient on. Get the Eye Dropper Tool and click on the Gradient.
Save the document (if you haven’t already before).

NEXT : We jump into Adobe Photoshop for the finishing touches
Adobe Photoshop now provides the tools for completing our 3D Type
7. Use Photoshop to prepare the background : To present the font on a Happy Feet themed background, go into Photoshop and create a new document that’s 900×400 pixels. Copy & Paste this image from www.sxc.hu onto the canvas. Shrink the image down by pressing CTRL+T and dragging a top corner down while holding down the Shift Key (to keep the image perfect).

8. Merge files, join Illustrator into Photoshop : Open the saved text document in Photoshop and press CTRL+A to select all, then copy & paste it onto the previous canvas. Make the text image smaller like step 7. Double click on the text layer to go into Blending Options and put in the Outer Glow option below.

You’ll want to enlarge to see all the details in this DIALOG BOX
Final Result

Click image for enlargement
Hope you have enjoyed and benefited from this!
Ainsley,
designer for Tutorials Share.com
![]()
Special Thanks to Ainsley Bevis for sending in this tutorial. Be sure to visit Ainsley at BloomwebDesign.net
Ainsley is a passionate, and mostly self taught, Web and Graphic Designer based in Melbourne, Australia. As well as designing websites and graphic material for her clients she also enjoys playing guitar, piano, walking her dogs and cooking vegetarian food! Don’t miss all her great Adobe Illustrator Tutorials!
thanks for reading
Don’t forget … we encourage you to share your discoveries with other readers. Just send and email, contribute your own article, join the Design Cafe forums, or follow DTG on Facebook!