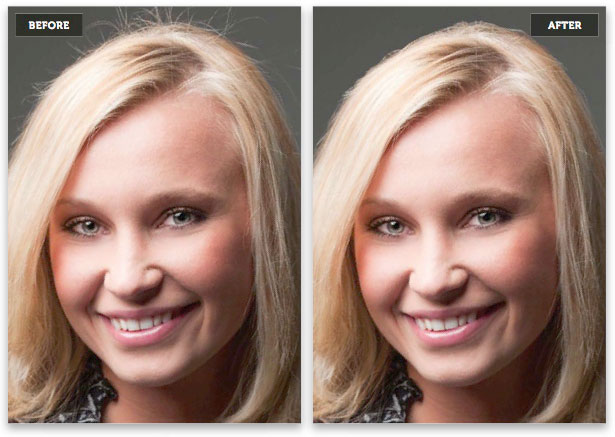
Scott Kelby shows you how to add highlights, remove strands, fix gaps, change color, darken a part line, and hide roots when retouching hair in Photoshop. In this episode, Scott shows you how to fix fly-away hair, stray strands of hair, and the “frizzies”
Scott Kelby shows you how to add highlights, remove strands, fix gaps, change color, darken a part line, and hide roots when retouching hair in Photoshop. In this episode, Scott will tackle adding highlights to otherwise dull hair.
![]() Scott writes:
Scott writes:
This is another one of those little things that makes a big difference, and once you take the few extra minutes to remove stray hairs, when you see portraits where the photographer didn’t take the time, they stick out like a sore thumb. Luckily, this one is much easier and faster than you might think (as long as the stray hairs extend outside of your subject, which is usually the case. If they cover an eye, or extend onto their face or clothes, be prepared to become a very patient person).
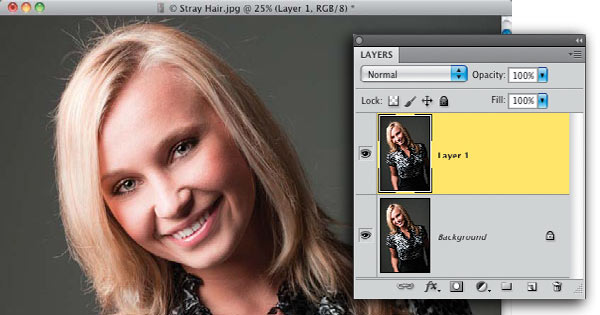
Step One: Here’s the image we want to retouch, and if you look closely, the subject’s hair is…well…it could use some anti-static retouching—mostly on top, and a bit on the side, and there’s one hair extending onto her forehead we should probably fix while we’re there, too. Start off by duplicating the Background layer by pressing Command-J (PC: Ctrl-J). We’ll be doing all our stray hair removal on this layer (which not only gives us an out if things get really squirrelly, but it’s a great way to see a quick before/after).
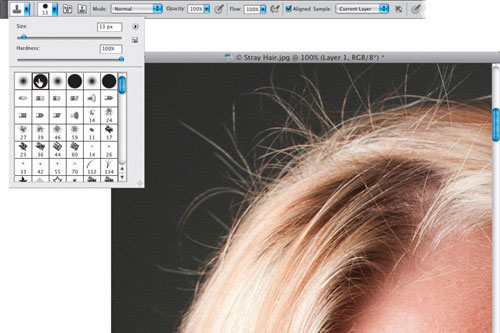
Step Two: Because we’re going to have to trim right up to the sides of the hair, the Healing Brush isn’t going to work well on this retouch—it would smear the edges when we got up close to the outside edge of her hair. So, instead, my tool of choice for this is the Clone Stamp tool (S), with a hard-edged brush, like the one you see me choosing here from the Brush Picker. Now, it’s time to zoom in (to at least 100%) and get to work. (Note: If your background isn’t an even color, you may have to start with the Healing Brush tool, and switch to the Clone Stamp tool as you get closer to her head.)
Step Three: The actual brush size you choose should be just a little bit larger than the hairs you want to remove, so don’t just go with the size I’m using here for your other projects. Look at the hair strands and choose your brush size based on that—a little larger than the strand you’re trying to remove.
Now, pick a starting point where you can follow around the head and not miss any spots (I’m starting on the lower-left side of the photo here). Here’s what to do now: press-and-hold the Option (PC: Alt) key and click once just outside the strand you want to remove, in a clean area without any hair. It needs to be pretty darn close, so the color, tone, and texture you’re sampling here are nearly identical to what’s around the strand you’re about to remove.
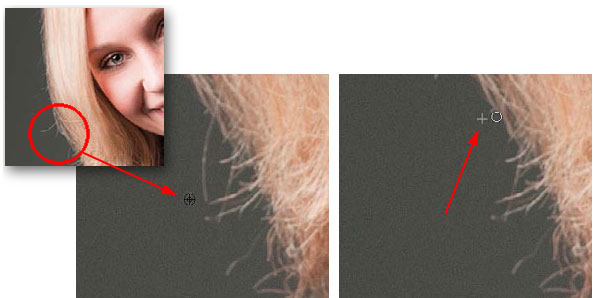
Step Four: Start at the end of the hair farthest away from the head, and follow along the path of the hair, almost like you’re tracing it, and stop when you reach her head (as seen above, right). The little plus sign to the left of my brush tip cursor shows you how close to where I’m painting I sampled (Option-clicked) in the previous step. Don’t sample so close that you clone over yourself (and repeat some of the hair you’re trying to remove), but get fairly close. If you make a mistake, just press Command-Z (PC: Ctrl-Z) to Undo your last stroke and try again. If you need to undo more than one stroke, press Command-Option-Z (PC: Ctrl-Alt-Z) up to 20 times to undo your last 20 steps (that’s all you get by default). If you think you’ll need more undos, then you and I need to have a talk (kidding!). Go to Photoshop’s Preferences (under the Photoshop menu on a Mac, or the Edit menu on a PC), to Performance, and where it says History & Cache, type in a higher number of History States. It takes up more memory, but you get more undos.
NEXT: Now using this process, let’s fix other problems in this image…
Step Five: That’s basically the process—you sample near a strand of hair, and use the Clone Stamp tool to remove it, stopping right at the main body of her hair. Now, that being said, you notice how the hairs are starting to look kind of straight and lopped off in a straight line (retouchers call this “helmet head”)? I try to do two things to keep things looking a little more random: (1) I don’t remove all the stray hairs—I try to leave a few short ones here and there, so it looks somewhat natural, and (2) I try not to leave them looking cut off straight. Here’s a great tip for what to do for that: get the Smudge tool from the Toolbox (shown here, nested below the Blur tool) and, using its default settings and a brush size just a tiny bit bigger than the hair, paint a few strokes over the ends. It pulls the hair out, so it tapers at the end and looks natural (just paint your strokes in the direction of the hair). Now, let’s look at this really annoying strand here, because it’s going to pose its own problem. Start by switching back to the Clone Stamp tool and sampling right above it (as shown here).
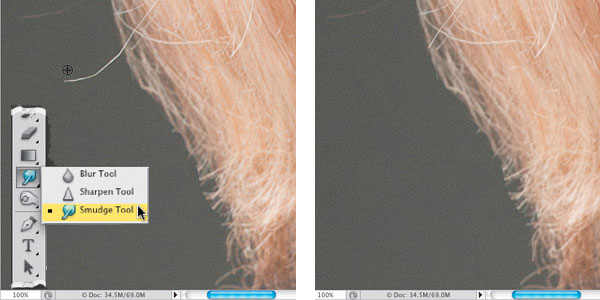
Step Seven: You’re going to Option-click (PC: Alt-click) inside the hair, just above the “broken off” end of the strand you just removed, and use that to cover the end a bit. Now, just move down over the broken off end, and simply click once (as shown here).
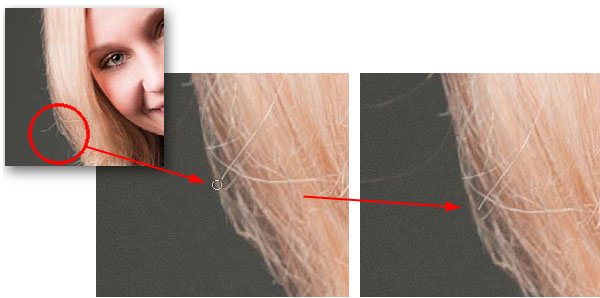
Step Eight: This kind of moves the end back a little more inside the hair, and it doesn’t look as obvious. Yes, this is a very subtle thing, and you have to decide if it’s even worth doing for the intended final use (for example, if the final use is somebody’s Facebook profile photo, I’m not sure I’d even consider doing this), but again, as the photographer, you have to decide what level of retouching is necessary for the job. Now, just continue around the head, going from the left, up over the top, and ending on the right, removing as many stray hairs as you feel is practical. Just remember not to make it look like you did this with the Path tool or a pair of scissors.
Step Nine: Now, let’s look at stray hairs that extend over the skin, like you see here on her forehead, where one big one, and a few friends, are encroaching on our otherwise unfettered skin area (I know, I went all Masterpiece Theatre on you there for a moment). Since part of it is on skin, and part of it goes near the hair, I use a two-tool approach in cases like this.
NEXT: Now, let’s fix problems where hair crosses the skin…
Step 10: I start with the Healing Brush tool (press Shift-J until you have it) to get rid of most of the stray hair extending over the skin. We’re basically doing a skin repair, and the Healing Brush works well for this, so sample (Option-click [PC: Alt-click]) an area of skin very near the stray hair and paint over it, stopping when you start to get near the hairline (as seen here).
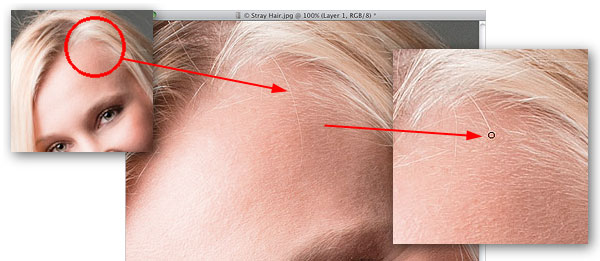
Step 11: Switch to the Clone Stamp tool again, and choose a very small, soft-edged brush at 100% opacity. Sample a clean area very near the last bit of hair you need to remove, and clone that final section away, so it’s completely gone (as seen here). While I was there, I cleaned up the other few stray hairs over the skin using the same two-tool combination.
Step 12: Now, you can see other hairs out of place that are over the main parts of her hair (meaning they’re not extending onto her skin, or onto the background. They’re just messy hairs). For example, take a look at the hair I have circled here in red. For these, I mostly use a technique for moving pieces of hair (which you’ll learn next), because when you start cloning hair, it usually looks kind of fake. It might look okay from a distance (and fine for low-res Web photos, or Facebook profile pages, and stuff like that), but if this is going to be a print or an image that really matters, you’ll need to move existing pieces of clean hair down over the stray hair to cover it.
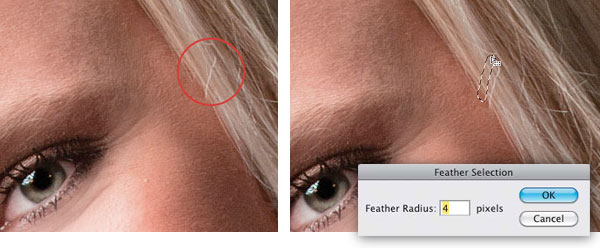
Step 13: Start by getting the Lasso tool (L) and draw a selection around the hair in question, leaving just a little space around it. While you still have the Lasso tool, click inside your selected area and drag that selection just a tiny bit above the hair, to a clean area of hair, as seen here (of course, if there isn’t a clean area above it, try just below it).
Now, to soften the edges, go under the Select menu, under Modify, and choose Feather. When the Feather Selection dialog appears, enter 4 pixels for just a tiny bit of edge softening, and click OK.
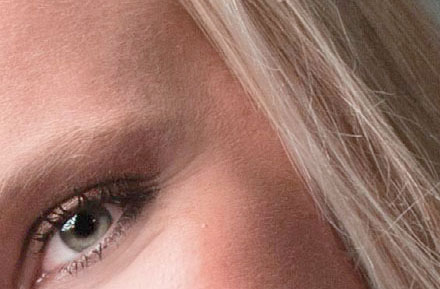
Step 14: Press Command-J (PC: Ctrl-J) to lift that selected area of clean hair and put it up on its own layer. Now, switch to the Move tool (V), and drag this layer down and position it right over the stray hair to cover it completely (as shown above, left). If you made your selection small enough, it should be a perfect fit and not overlap anything or cause any other problems. If, for some weird reason, it’s not a perfect fit, press Command-T (PC: Ctrl-T) to bring up Free Transform, then press-and-hold the Command (PC: Ctrl) key, click on one of the Free Transform corner points, and bend the hair so it fits the right way (holding that key lets you distort the shape the way you want it), then press Return (PC: Enter) to lock in your transformation. Again, you probably won’t need to do that last part, but hey—ya never know.
Retouching hair is one of the trickiest retouches, because the Clone Stamp tool and the Healing Brush tool usually give you pretty lame results. So, you usually have to move hair from one place to another to cover the problem, and this is one of the situations where you need to do just that—covering a gap in the hair caused by your subject’s position, or movement, or a fan, or one of the dozen things that cause a gap to appear temporarily and mess up your shot.
![]() Excerpted from : Professional Portrait Retouching Techniques by Scott Kelby
Excerpted from : Professional Portrait Retouching Techniques by Scott Kelby
Excerpted from Professional Portrait Retouching Techniques for Photographers
Using Photoshop by Scott Kelby. Copyright ©2011. Used with permission of
Pearson Education, Inc. and New Riders.
![]()
![]()
![]()
![]()
Peachpit / New Riders / Kelby Media![]()
![]()
![]()
![]()
Professional Portrait Retouching Techniques / Amazon

