Next in our series, Scott Kelby walks you through the steps of changing hair color — afairly common, especially if you’re trying to match the clothes, etc. There are some crafty tips in this free Photoshop tutorial for going both light and dark!
![]()
 Scott Kelby continues this series of retouching hair with coloring! Scott writes:
This is fairly common, especially if you’re working with an art director who wants the model’s hair to match the clothes, but luckily, most of the time, a change of hair color is fairly subtle, and not from one extreme to another.
Step One: Here’s the image where we’re going to (eventually) change her hair color from blonde to brunette, but we’re going to have a couple of stops at different colors along the way, along with a technique variation, so you’ve got lots of options (especially if your subject, or client, wants a big variation in color).
Step Two: Start by getting the Quick Selection tool (W) and then literally paint over your subject’s hair to select it. If it over-selects, and starts selecting her face, you can remove that spillover by pressing-and-holding the Option (PC: Alt) key and painting over the spillover areas to deselect them.
Use a fairly small brush, and just keep painting until it’s all pretty much selected (as shown here). Also, you don’t have to worry about making a perfect selection for two reasons: (1) we’re going to have Photoshop fine-tune the selection for us in the next step, and (2) we’ll automatically have a layer mask, so we can fine-tune the mask just by painting on it if it needs tweaking. So, relax, and get your selection kinda close, then move on to Step Three.

Step Three: Once your selection is in place, and while you still have the Quick Selection tool, go up to the Options Bar up top and click on the Refine Edge button (As shown above, right). This brings up the Refine Edge dialog, and gives you a preview of your selection (you can choose to view your selection on different backgrounds—choose the On White background from the View pop-up menu, so it looks like it does here). You can see from the selection we have here, it’s pretty harsh and jaggy, but don’t worry — that’s all about to go away.
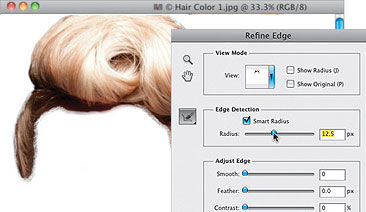
Step Four: To get a much better, smoother, and more encompassing selection, go to the Edge Detection section of the dialog and turn on the Smart Radius checkbox.
This helps you get a better, more accurate edge around your selection (especially helpful with hair), but just turning on the checkbox isn’t enough—you need to then take the Radius slider and drag it to the right (as shown here), and you’ll see the edges start to change from harsh to very usable (as seen here). Again, they don’t have to be perfect—you can always edit the mask we’re going to make in a moment by just painting on it. So, at this point, we’re definitely closer, but if it’s not perfect, just roll on.
Okay … so now, let’s add some color …
Step Five: When you click OK in the Refine Edge dialog, the dialog goes away and your selection is back in place, and of course, even though you can’t see it, your selection is dramatically better.
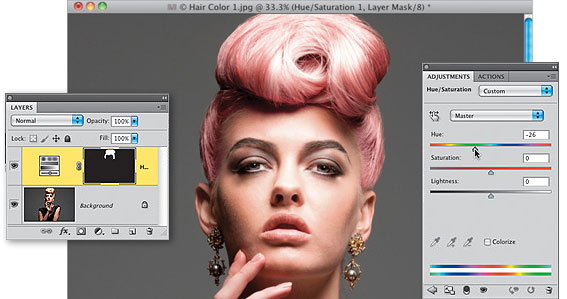
So, click on the Create New Adjustment Layer icon at the bottom of the Layers panel, and choose Hue/Saturation from the pop-up menu. Now, changing hair color is as easy as dragging the Hue slider in the Adjustments panel. Here, I dragged it to the left a little bit and the hair turned pink. Once you make an adjustment like this, you’ll be able to see much more clearly if you missed any areas with your selection, and luckily, your Hue/Saturation adjustment layer comes with a layer mask, so you’re ready to edit.

If you see you missed an area, get the Brush tool (B), make sure your Foreground color is set to white, choose a small brush, and paint right on the photo on the area you missed to add it. If you selected too much, paint on that area in black to get rid of it.
Step Six: Now, if the color is too intense, drag the Saturation slider to the left (I usually have to do this to some extent when changing hair color, or the new color becomes too overpowering, so you can almost count on having to lower the Saturation amount. While you’re there, go ahead and lower it quite a bit and her hair turns almost silver, which in this case looks kinda cool). Okay, the variation I talked about earlier is to turn on the Colorize checkbox at the bottom of the Hue/Saturation options in the Adjustments panel (shown circled in red here) and you get a different result from your Hue, because now rather than just shifting the Hues that are there, it’s pouring a tint on top of your color.

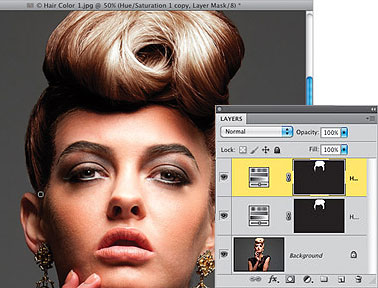
Step Seven: To change her hair to brunette, we’re going to change the pop-up menu at the top of the Adjustments panel back to Default, then go to the Layers panel and change the blend mode of this Hue/Saturation adjustment layer to Multiply. We’re just going to use this layer for the blend mode change, so, press Command-J (PC: Ctrl-J) to duplicate the layer. We’ll now change the color using this duplicate layer, so in the Hue/Saturation options in the Adjustments panel, turn on the Colorize checkbox, and drag the Hue slider almost all the way to the left, until it reads 4, then lower the Saturation until the color look about right to you (here, I lowered it to 14). Now, click back on your first adjustment layer, and lower its Opacity until the color looks more realistic (usually around 18%, as shown here).
Note: The Multiply layer works for changing light hair to a darker color. If you need to change dark hair to a lighter color, you’d change the blend mode to Screen instead.
Step Eight: This last step is optional, but if it looks like you still are missing any part of her hair, now is when you’ll fix it (there were a few hairs by each ear and along the temple on the left that I missed in my selection, and that still looked blonde). So, get the Brush tool, and lower the Opacity in the Options Bar to around 30%, then paint over the hairs you missed. By painting with a low opacity like this, you can build up the color—perfect for these small, wispy hairs.
Then you’ll need to copy this layer mask over the one on the bottom Hue/Saturation adjustment layer, so they match. To do this, simply press-and-hold the Option (PC: Alt) key and click-and-drag the mask on the top adjustment layer over the one on the bottom adjustment layer. A dialog will appear asking if you want to replace the mask, so click Yes and you’re done. ![]() Click to see the final image.
Click to see the final image.
![]() NEXT : Darkening a Part Line as we continue our series on retouching hair!
NEXT : Darkening a Part Line as we continue our series on retouching hair!
![]() Excerpted from : Professional Portrait Retouching Techniques by Scott Kelby
Excerpted from : Professional Portrait Retouching Techniques by Scott Kelby
Excerpted from Professional Portrait Retouching Techniques for Photographers
Using Photoshop by Scott Kelby. Copyright ©2011. Used with permission of
Pearson Education, Inc. and New Riders.
![]()
Peachpit / New Riders / Kelby Media![]()
Professional Portrait Retouching Techniques / Amazon
 Scott Kelby is Editor, Publisher, and co-founder of Photoshop User magazine, host of the top-rated weekly videocast Photoshop User TV, and co-host of D-Town TV (the weekly videocast for DSLR shooters). He is President of the National Association of Photoshop Professionals (NAPP), the trade association for Adobe Photoshop users, and he¹s President of the training, education, and publishing firm, Kelby Media Group, Inc.