Ainsley is back with her second great tutorial to follow the gift wrap tutorial … this time, we’re making holiday tags using Photoshop! Enjoy

![]()
Special thanks to Ainsley Bevis from BloomWebDesign.net for sending in this great Adobe Illustrator tutorial! She covers a number of good techniques good for beginner to intermediate Illustrator users, and some of the tricks are sheer genious!
Ainsley writes . . .
Learn how to create a present Name Tag a christmas theme in Photoshop!
1. Generate the file for the basic tag
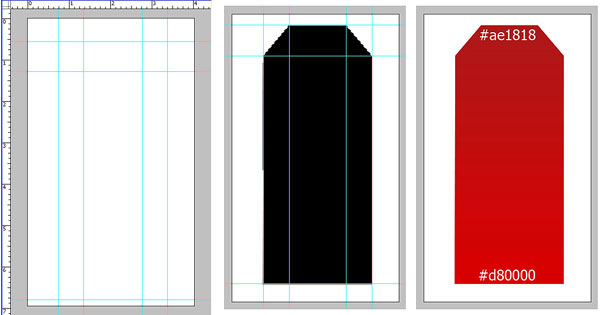
Create a new doucment that’s 290×500 px.
Go to View > Ruler (or ctrl +r) and drag lines out like below.
Get the pen tool, hold down the shift key and make the tag shape like below.
Go into Blending Options on the layer and make an Overlay Gradient with the following colors. (Click here for an enlarged diagram)

2. Use Layers to create the border
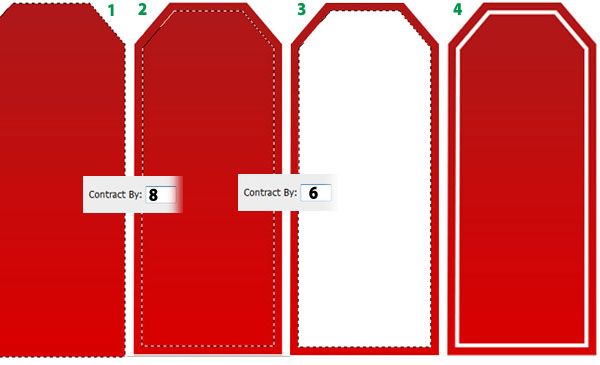
(1) Hold down ctrl/click on the box on the shape in the Layers Palette to highlight it. (See racing ants selection marquee around the shape.)
(2) Go to select>Modify and contract by 8px. With the shape still highlighted create a new layer and fill it with white.
(3) Contract the new shape again by 6 pixles and (4) press delete so only a white frame is left.

NEXT: we’ll use shapes and pen tool to create our happy snow man …


3. Create the Snow Man
Get the Ellipse Tool, hold down shift and create a white circle.
Get the pen tool and draw a body like above.
Using the pen tool again create a hat and shadows.
Using the Ellipse tool holding down shift, create the eyes and smiley face.
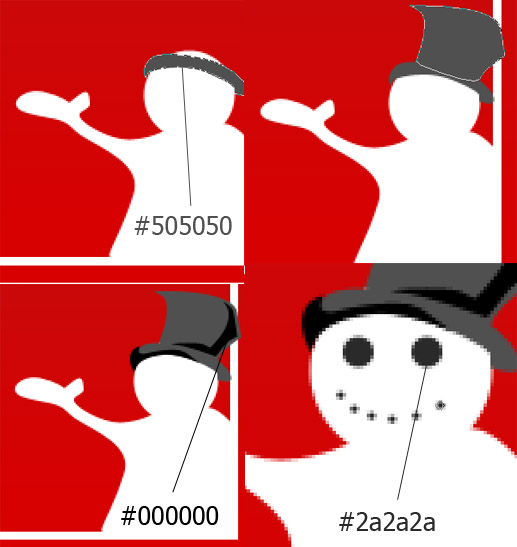

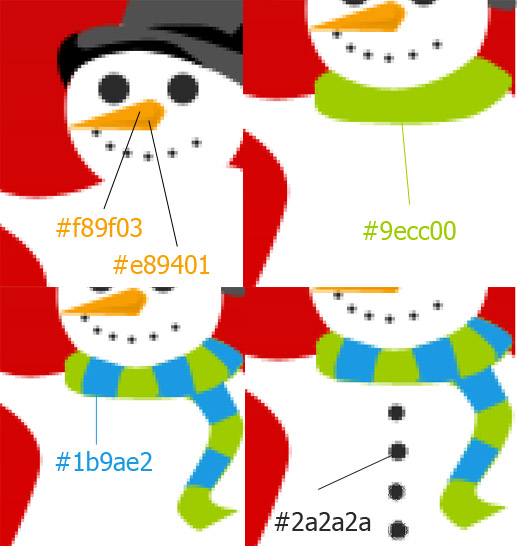
Keep drawing … create the carrot nose, scarf and buttons using the pen tool and ellipse tool.
Create some highlights with the pen tool.

NEXT: Now use the Custom Shape Tool to make snow flakes …


4 Adding Decorations and Typography
Go to custom shapes and get this snow flake shape. Create 3 shapes like below using the colour white. Make the opacity 19%.
Write in the words below using the font,Candy Cane.
5. Make the Tag Hanger
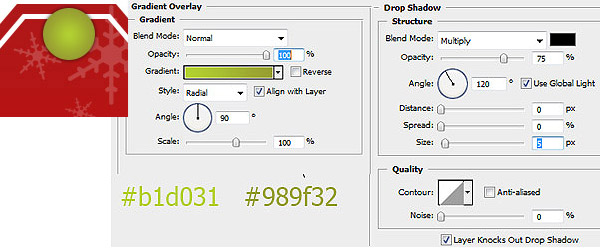

Create a circle using the blending options above.
Create another smaller circle.
Zoom in to the top of the tag and draw a ‘drop’ shape with the pen tool using the colour #d0d3a1.


NEXT: Now Add the string and we’ll be finished …


5. Add the String and finish your tags …
Using the pen tool create these shapes above for the string.
Hold down ctrl and press the big string shape to highlight it. Go to Select > Modify and contract by 3px.
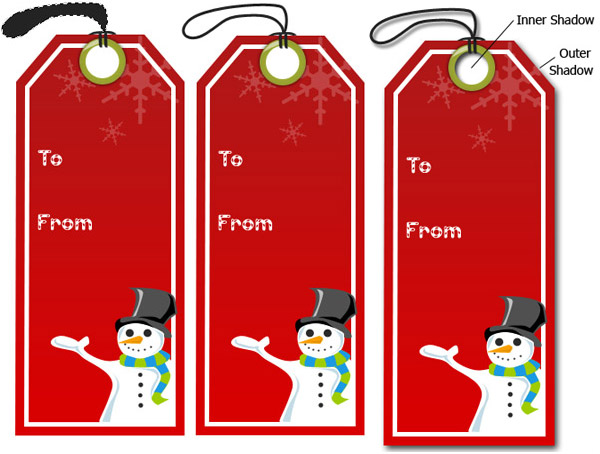

Next go into Blending Options on the string and tag shape and put a Drop Down Shadow. In the small white circle put a inner shadow.


![]()
![]()
![]()
Special Thanks to Ainsley Bevis for sending in this tutorial. Be sure to visit Ainsley at BloomwebDesign.net
Ainsley is a passionate, and mostly self taught, Web and Graphic Designer based in Melbourne, Australia. As well as designing websites and graphic material for her clients she also enjoys playing guitar, piano, walking her dogs and cooking vegetarian food! Don’t miss all her great Adobe Illustrator Tutorials!
thanks for reading!
If you liked this tutorial and would like to see more, just send an email, or click the “SHARE” button below to TWEET it or SHARE it on your favorite networking site!
![]()
![]()
![]()
![]()
![]()
![]()
![]()
![]()
![]()
![]()
![]()
![]()