Wondering what to do with your photos to make a unique presentation? One of the more popular layouts we’ve presented over the years is the Digital photo tent display – great novelty, and a wonderful gift idea
 IF YOU’RE WONDERING what you could do with all those digital photos of the kids this year, this idea will be a smash-hit, for anyone on your gift list… even yourself!
Digital photos gift ideas…
Each year we like to highlight some of the outstanding samples we’ve seen and ask ourselves is there opportunity for a do-it-yourself project.
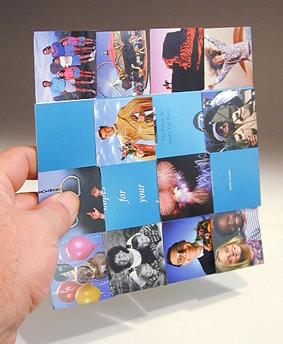
Such is the case with this stunning promotional card sent by Progress Printing* in Lynchburg, Virginia. These guys have been my favorite color printing firm for going on 30 years, and they never cease to amaze me with some of the things they come up with.

This is four identically cut pieces of 8 point cover stock, each with its own lavish 5 color/plus varnish message. The panels together give you spaces for 24 images in 2-inch squares. The whole display collapses and mails flat in a standard 7-inch square envelope, as you can see from the photo below.
You’ll end up with a shape as shown at right. This will be a single face. Once you get the template and get handy, try modifying it — the “wings” could be circles or even other, unusual shapes. As long as you keep the central, straight columns in tact, it will work like a charm. Remember to make a front and back for each of the two panels.
Note the ‘nicks’ in some crotches are helpful in ‘locking’ the pieces together.
This is NOT a project for the casual inkjet jockey because it requires printing both sides of the sheet, and will need some rather delicate cutting. Yes, you could have it printed and die-cut, and I’m sure Progress will be happy to let you utilize the very same die. However for one or two up to a dozen gifts, this is a prize that the recipient will want to keep.
I’m including the template and some instructions for this in the Publishers’ Warehouse for those who subscribe to the newsletter and wish to give it a whirl.
Keep in mind that while the project requires some stiff paper, you’ll be printing one side of the sheet, then gluing it with another, back to back, which should give you sufficient bulk.
I don’t recommend doing the final cut-out until you’ve glued the sheets back to back… better to cut them both at the same time. Be sure to include at least an eighth-inch of bleed because your cutting skills may not be quite as accurate as you’d like them to be. Use a bright window as a light box to see through the paper while aligning the sheets back-to-back. Hold them in register with a little tape then glue with a non-water spray adhesive. The ultimate product for laminating the two sheets together is double surface dry-mounting material available at your local art supply, or photo store. You can also mail order from Charettes. (My favorite for 30+ years: 800-367-3729.)
Once printed, and laminated it might be a good idea to spray with some Krylon Crystal Clear or other good spray varnish coating. For a dazzling effect, drop the uncut sheets off at Kinko’s for plastic lamination into a permanent object’d’art. WOW!
Take your time and plan to make a few mistakes. (Don’t feel bad. I had to make six of the darn things before I got the template just right!) Once you’ve made your first prototype, the next one will be a cinch! If you don’t want to tackle laminating back to back, see if your on-demand color printer can print them accurately enough on cover stock. If so, then you’re home free. Have fun.
Download our “Photo Tent” (Adobe Illustrator Cutting Template) from the Loading Dock of the Publishers Warehouse*
Thanks for reading
![]()
Don’t forget … we encourage you to share your discoveries about favorite or famous graphic designers and illustrators with other readers. Just comment below, contact me here, or just give me a tweet at Twitter/DTG_Magazine